
Implement MVVM using UIKit, RxSwift, Combine, and SwiftUI is interesting because it shows how a single architectural pattern adapts across very different UI and reactive paradigms. By comparing these approaches, readers can clearly distinguish MVVM’s core responsibilities.
This perspective reflects the real evolution of iOS codebases, helps developers reason about architectural trade-offs, and demonstrates that MVVM is a long-lasting design mindset rather than a framework-dependent trend.
MVVM Pattern
MVVM splits your app into three layers so UI code stays simple and testable:
Model
Your domain data + business rules (e.g.,
User,Order, validation, persistence entities).No UI knowledge.
View
The UI layer (SwiftUI
Viewor UIKitUIViewController/UIView).Displays state and forwards user events (tap, refresh, text input).
Should contain minimal logic—mostly layout + binding.
ViewModel
The “presentation logic” layer.
Transforms Models into UI-ready state (strings, sections, flags like
isLoading,errorMessage).Handles user intents (e.g.,
loginTapped(),load()), calls services, updates state.
Class diagram
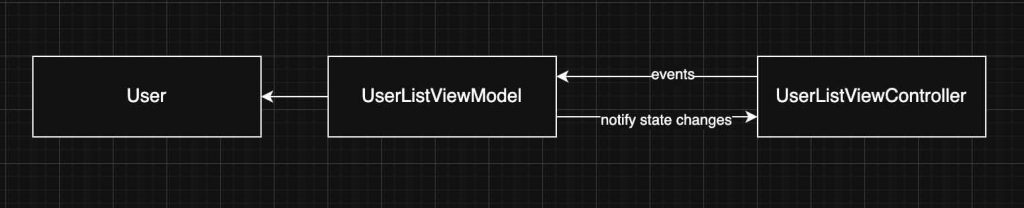
Observing the class diagram is easier to see a possile retain cycle can occur between the View and the ViewModel, but only if they reference each other strongly. This typically happens in UIKit when the ViewModel exposes closures (e.g., callbacks for UI updates) and the View captures self strongly inside those closures; the View holds the ViewModel, and the ViewModel indirectly holds the View through the closure. To avoid this, capture self weakly ([weak self]) in closures. In SwiftUI, retain cycles are much less common because the View is a value type (struct) and the framework manages the lifecycle, but you still need to be careful with long-lived objects, timers, or async tasks inside the ViewModel that capture references strongly.
UIKit
UIKit UIViewController displays a list of users in a table view using the MVVM pattern: the controller owns a UserListViewModel, sets up the UI and table view configuration in viewDidLoad, and establishes a binding via a closure (onDataUpdate) so that when the ViewModel finishes fetching users and updates its data, the table view is reloaded. The closure captures self weakly to avoid a retain cycle between the view controller and the ViewModel, and the actual data-fetching logic is delegated to the ViewModel through fetchUsers(), keeping presentation logic separated from UI concerns.
class UserListViewController: UIViewController {

    private let tableView = UITableView()
    private let viewModel = UserListViewModel()
    private let cellId = "UserCell"

    override func viewDidLoad() {
        super.viewDidLoad()
        setupUI()
        setupBindings()
        viewModel.fetchUsers()
    }

    private func setupBindings() {
        viewModel.onDataUpdate = { [weak self] in
            self?.tableView.reloadData()
        }
    }

    private func setupUI() {
        title = "Usuarios"
        view.addSubview(tableView)
        tableView.frame = view.bounds

        tableView.dataSource = self
        tableView.register(UITableViewCell.self, forCellReuseIdentifier: cellId)
    }
}

// MARK: - TableView DataSource
extension UserListViewController: UITableViewDataSource {
    func tableView(_ tableView: UITableView, numberOfRowsInSection section: Int) -> Int {
        return viewModel.numberOfUsers
    }

    func tableView(_ tableView: UITableView, cellForRowAt indexPath: IndexPath) -> UITableViewCell {
        let cell = tableView.dequeueReusableCell(withIdentifier: cellId, for: indexPath)
        let user = viewModel.user(at: indexPath.row)

        // Configuramos la celda usando los datos procesados por el ViewModel
        var content = cell.defaultContentConfiguration()
        content.text = user.name
        content.secondaryText = user.email
        cell.contentConfiguration = content

        return cell
    }
}
The ViewModel for an MVVM architecture that manages a private list of User models and exposes table-friendly accessors (numberOfUsers and user(at:)) to the View, while using a closure (onDataUpdate) as a simple binding mechanism to notify the View when data changes. The fetchUsers() method simulates an asynchronous API call, updates the internal user list after a delay, and triggers the callback so the UI (such as a table view) can refresh without the ViewModel depending on any UIKit components.
import Foundation

class UserListViewModel {
    private var users: [User] = []

    var onDataUpdate: (() -> Void)?

    var numberOfUsers: Int {
        return users.count
    }

    func user(at index: Int) -> User {
        return users[index]
    }

    func fetchUsers() {
        DispatchQueue.main.asyncAfter(deadline: .now() + 1.5) {
            self.users = [
                User(name: "Alice", email: "alice@example.com"),
                User(name: "Bob", email: "bob@example.com"),
                User(name: "Charlie", email: "charlie@example.com")
            ]
            self.onDataUpdate?()
        }
    }
}
RxSwift
RxSwift is a reactive framework for Swift that represents asynchronous events as observable streams, enabling a declarative and composable way to handle data flow, UI updates, and state changes without relying on callbacks or delegates.
RxSwift is a 3rd party and first step is include it in the project:
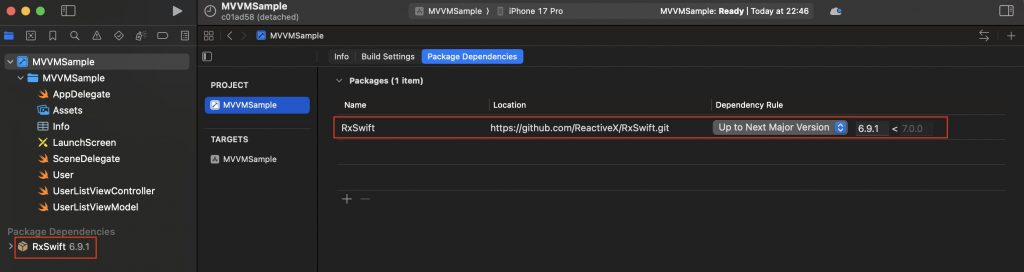
With plain UIKit, MVVM uses imperative bindings like closures or delegates to update the View, while with RxSwift it uses declarative reactive streams that automatically propagate changes, resulting in cleaner data flow but more abstraction.
This code defines a UIKit UIViewController that uses RxSwift and RxCocoa to apply the MVVM pattern in a reactive style. The view controller displays a table view and connects it to a stream of User data coming from the ViewModel, so the table updates automatically whenever the data changes. It also listens for row selection events to respond to user actions, manages memory using a DisposeBag, and keeps the controller focused on UI setup while data updates and events are handled through reactive bindings instead of manual callbacks.
import UIKit
import RxSwift
import RxCocoa

class UserListViewController: UIViewController {

    private let tableView = UITableView()
    private let viewModel = UserListViewModel()
    private let disposeBag = DisposeBag()
    private let cellId = "UserCell"

    override func viewDidLoad() {
        super.viewDidLoad()
        setupUI()
        setupBindings()
        viewModel.fetchUsers()
    }

    private func setupBindings() {
        viewModel.users
            .bind(to: tableView.rx.items(cellIdentifier: cellId, cellType: UITableViewCell.self)) { (row, user, cell) in
                var content = cell.defaultContentConfiguration()
                content.text = user.name
                content.secondaryText = user.email
                cell.contentConfiguration = content
            }
            .disposed(by: disposeBag)

        tableView.rx.modelSelected(User.self)
            .subscribe(onNext: { user in
                print("Usuario seleccionado: \(user.name)")
            })
            .disposed(by: disposeBag)
    }

    private func setupUI() {
        title = "Usuarios Rx"
        view.addSubview(tableView)
        tableView.frame = view.bounds
        tableView.register(UITableViewCell.self, forCellReuseIdentifier: cellId)
    }
}
ViewModel using RxSwift that manages and exposes a list of User models as a reactive data stream: it stores the users in a BehaviorRelay, which always holds the latest value, exposes it to the View as a read-only Observable, and updates the stream in fetchUsers() by accepting new data, causing any subscribed Views (such as a table view) to automatically receive the updated user list and refresh without manual callbacks or delegates.
import RxSwift
import RxRelay

class UserListViewModel {

    private let usersRelay = BehaviorRelay<[User]>(value: [])

    var users: Observable<[User]> {
        return usersRelay.asObservable()
    }

    func fetchUsers() {
        let mockData = [
            User(name: "Alice", email: "alice@example.com"),
            User(name: "Bob", email: "bob@example.com"),
            User(name: "Charlie", email: "charlie@example.com")
        ]
        usersRelay.accept(mockData)
    }
}
Combine
Combine is Apple’s native reactive framework for handling asynchronous data with publishers and subscribers. Compared to RxSwift in MVVM, Combine is more tightly integrated with Swift and SwiftUI and uses less boilerplate, while RxSwift is more mature, feature-rich, and cross-platform but requires a third-party dependency.
This code defines a UIKit UIViewController that uses Combine to implement MVVM-style data binding: it observes the @Published users property exposed by the ViewModel via the $users publisher, ensures updates are delivered on the main thread, and reloads the table view automatically whenever the user list changes, while managing the subscription lifecycle with a set of AnyCancellable objects and keeping the ViewController focused on UI setup and rendering rather than data-fetching logic.
import UIKit
import Combine

class UserListViewController: UIViewController {

    private let tableView = UITableView()
    private let viewModel = UserListViewModel()
    private let cellId = "UserCell"

    private var cancellables = Set<AnyCancellable>()

    override func viewDidLoad() {
        super.viewDidLoad()
        setupUI()
        setupBindings()
        viewModel.fetchUsers()
    }

    private func setupBindings() {
        viewModel.$users
            .receive(on: RunLoop.main)
            .sink { [weak self] _ in
                self?.tableView.reloadData()
            }
            .store(in: &cancellables)
    }

    private func setupUI() {
        title = "Usuarios con Combine"
        view.addSubview(tableView)
        tableView.frame = view.bounds
        tableView.dataSource = self
        tableView.register(UITableViewCell.self, forCellReuseIdentifier: cellId)
    }
}
This code defines a ViewModel using Combine that manages a list of User models for an MVVM architecture: it exposes the users array as a read-only @Published property so any subscribers are automatically notified when it changes, and simulates an asynchronous data fetch in fetchUsers() by updating the users after a delay on the main thread, which triggers Combine’s publisher to emit a new value and allows bound Views to refresh their UI reactively.
import Foundation
import Combine

class UserListViewModel {
    @Published private(set) var users: [User] = []

    func fetchUsers() {
        DispatchQueue.main.asyncAfter(deadline: .now() + 1.0) {
            self.users = [
                User(name: "Ana Combine", email: "ana@apple.com"),
                User(name: "Pedro Publisher", email: "pedro@apple.com"),
                User(name: "Sara Subscriber", email: "sara@apple.com")
            ]
        }
    }
}
SwiftUI
SwiftUI is naturally aligned with the MVVM pattern because its declarative UI model is designed to observe and react to state changes exposed by ViewModels: the View is a lightweight struct that binds to an ObservableObject ViewModel, the ViewModel uses properties like @Published to expose state derived from Models, and SwiftUI automatically updates the UI whenever that state changes. As a result, MVVM in SwiftUI requires very little glue code, encourages clear separation of concerns, and makes reactive data flow the default rather than an added architectural layer.
This SwiftUI view displays a list of users using the MVVM pattern by owning a @StateObject UserListViewModel, conditionally rendering a loading indicator while data is being fetched and a List of user details once loading completes, and triggering the data load in onAppear; SwiftUI automatically re-renders the UI whenever the ViewModel’s published state (users or isLoading) changes, keeping the view declarative and free of data-fetching or presentation logic.
import SwiftUI

struct UserListView: View {
    @StateObject private var viewModel = UserListViewModel()

    var body: some View {
        NavigationView {
            Group {
                if viewModel.isLoading {
                    ProgressView("Loading users...")
                } else {
                    List(viewModel.users) { user in
                        VStack(alignment: .leading) {
                            Text(user.name)
                                .font(.headline)
                            Text(user.email)
                                .font(.subheadline)
                                .foregroundColor(.secondary)
                        }
                    }
                }
            }
            .navigationTitle("Users")
            .onAppear {
                viewModel.fetchUsers()
            }
        }
    }
}
This code defines a SwiftUI-compatible ViewModel that conforms to ObservableObject and manages user list state for an MVVM architecture: it exposes the users array and a loading flag as @Published properties so SwiftUI views automatically react to changes, sets isLoading to true when a simulated asynchronous fetch starts, updates the users after a delay on the main thread, and then resets the loading state, enabling the UI to seamlessly switch between loading and content states.
import Foundation
import Combine

class UserListViewModel: ObservableObject {
    @Published var users: [User] = []
    @Published var isLoading = false

    func fetchUsers() {
        isLoading = true

        DispatchQueue.main.asyncAfter(deadline: .now() + 1.5) {
            self.users = [
                User(name: "Ana SwiftUI", email: "ana@apple.com"),
                User(name: "Pedro State", email: "pedro@apple.com"),
                User(name: "Sara Binding", email: "sara@apple.com")
            ]
            self.isLoading = false
        }
    }
}
Conclusions
MVVM is a pattern that has been present since the early days of Swift and has been easily adopted across different eras of iOS development, from UIKit to SwiftUI, including reactive approaches with RxSwift and Combine.
You can find the source code for this example in the followingGitHub repository. There is a commit per approach.
References
- MVVM
Wikipedia


