Autor: admin

  • Seamless Text Input with Your Voice on iOS

    Seamless Text Input with Your Voice on iOS

    Most likely, you have faced a situation where you’re enjoying the seamless flow of an application—for instance, while making a train or hotel reservation. Then, suddenly—bam!—a never-ending form appears, disrupting the experience. I’m not saying that filling out such forms is irrelevant for the business—quite the opposite. However, as an app owner, you may notice in your analytics a significant drop in user conversions at this stage.

    In this post, I want to introduce a more seamless and user-friendly text input option to improve the experience of filling out multiple fields in a form.

    Base project

    To help you understand this topic better, we’ll start with a video presentation. Next, we’ll analyze the key parts of the code. You can also download the complete code from the repository linked below.

    To begin entering text, long-press the desired text field. When the bottom line turns orange, it indicates that the has been activated speech-to-text mode. Release your finger once you see the text correctly transcribed. If the transcribed text is correct, the line will turn green; otherwise, it will turn red.

    Let’s dig in the code…

    The view is built with a language picker, which is a crucial feature. It allows you to select the language you will use later, especially when interacting with a form containing multiple text fields.

    struct VoiceRecorderView: View {
       @StateObject private var localeManager = appSingletons.localeManager
        @State var name: String = ""
        @State var surename: String = ""
        @State var age: String = ""
        @State var email: String = ""
        var body: some View {
            Form {
                Section {
                    Picker("Select language", selection: $localeManager.localeIdentifier) {
                        ForEach(localeManager.locales, id: \.self) { Text($0).tag($0) }
                    }
                    .pickerStyle(SegmentedPickerStyle())
                    .onChange(of: localeManager.localeIdentifier) {
                    }
                }
    
                Section {
                    TextFieldView(textInputValue: $name,
                                  placeholder: "Name:",
                                  invalidFormatMessage: "Text must be greater than 6 characters!") { textInputValue in
                        textInputValue.count > 6
                    }
                    
                    TextFieldView(textInputValue: $surename,
                                  placeholder: "Surename:",
                                  invalidFormatMessage: "Text must be greater than 6 characters!") { textInputValue in
                        textInputValue.count > 6
                    }
                    TextFieldView(textInputValue: $age,
                                  placeholder: "Age:",
                                  invalidFormatMessage: "Age must be between 18 and 65") { textInputValue in
                        if let number = Int(textInputValue) {
                            return number >= 18 && number <= 65
                        }
                        return false
                    }
                }
                
                Section {
                    TextFieldView(textInputValue: $email,
                                  placeholder: "Email:",
                                  invalidFormatMessage: "Must be a valid email address") { textInputValue in
                        let emailRegex = #"^[A-Za-z0-9._%+-]+@[A-Za-z0-9.-]+\.[A-Za-z]{2,}$"#
                        let emailPredicate = NSPredicate(format: "SELF MATCHES %@", emailRegex)
                        return emailPredicate.evaluate(with: textInputValue)
                    }
                }   
            }
            .padding()
        }
    }

    For every text field, we need a binding variable to hold the text field’s value, a placeholder for guidance, and an error message to display when the acceptance criteria function is not satisfied.

    When we examine the TextFieldView, we see that it is essentially a text field enhanced with additional features to improve user-friendliness.

    struct TextFieldView: View {
        
        @State private var isPressed = false
        
        @State private var borderColor = Color.gray
        @StateObject private var localeManager = appSingletons.localeManager
    
        @Binding var textInputValue: String
        let placeholder: String
        let invalidFormatMessage: String?
        var isValid: (String) -> Bool = { _ in true }
        
        var body: some View {
            VStack(alignment: .leading) {
                if !textInputValue.isEmpty {
                    Text(placeholder)
                        .font(.caption)
                }
                TextField(placeholder, text: $textInputValue)
                    .accessibleTextField(text: $textInputValue, isPressed: $isPressed)
                    .overlay(
                        Rectangle()
                            .frame(height: 2)
                            .foregroundColor(borderColor),
                        alignment: .bottom
                    )
                .onChange(of: textInputValue) { oldValue, newValue in
                        borderColor = getColor(text: newValue, isPressed: isPressed )
                }
                .onChange(of: isPressed) {
                        borderColor = getColor(text: textInputValue, isPressed: isPressed )
                }
                if !textInputValue.isEmpty,
                   !isValid(textInputValue),
                    let invalidFormatMessage {
                    Text(invalidFormatMessage)
                        .foregroundColor(Color.red)
                }
            }
        }
        
        func getColor(text: String, isPressed: Bool) -> Color {
            guard !isPressed else { return Color.orange }
            guard !text.isEmpty else { return Color.gray }
            return isValid(text) ? Color.green : Color.red
        }
        
    }

    The key point in the above code is the modifier .accessibleTextField, where all the magic of converting voice to text happens. We have encapsulated all speech-to-text functionality within this modifier.

    extension View {
        func accessibleTextField(text: Binding<String>, isPressed: Binding<Bool>) -> some View {
            self.modifier(AccessibleTextField(text: text, isPressed: isPressed))
        }
    }
    
    struct AccessibleTextField: ViewModifier {
        @StateObject private var viewModel = VoiceRecorderViewModel()
        
        @Binding var text: String
        @Binding var isPressed: Bool
        private let lock = NSLock()
        func body(content: Content) -> some View {
            content
                .onChange(of: viewModel.transcribedText) {
                    guard viewModel.transcribedText != "" else { return }
                    self.text = viewModel.transcribedText
                }
                .simultaneousGesture(
                    DragGesture(minimumDistance: 0)
                        .onChanged { _ in
                            lock.withLock {
                                if !isPressed {
                                    isPressed = true
                                    viewModel.startRecording(locale: appSingletons.localeManager.getCurrentLocale())
                                }
                            }
                            
                        }
                        .onEnded { _ in
                            
                            if isPressed {
                                lock.withLock {
                                    isPressed = false
                                    viewModel.stopRecording()
                                }
                            }
                        }
                )
        }
    }

    The voice-to-text functionality is implemented in the VoiceRecorderViewModel. In the view, it is controlled by detecting a long press from the user to start recording and releasing to stop the recording. The transcribed voice text is then forwarded upward via the text Binding attribute.

    Finally, here is the view model that handles the transcription:

    import Foundation
    import AVFoundation
    import Speech
    
    class VoiceRecorderViewModel: ObservableObject {
        @Published var transcribedText: String = ""
        @Published var isRecording: Bool = false
        
        private var audioRecorder: AVAudioRecorder?
        private let audioSession = AVAudioSession.sharedInstance()
        private let recognitionRequest = SFSpeechAudioBufferRecognitionRequest()
        private var recognitionTask: SFSpeechRecognitionTask?
        private var audioEngine = AVAudioEngine()
        
        var speechRecognizer: SFSpeechRecognizer?
    
        func startRecording(locale: Locale) {
            do {
                self.speechRecognizer = SFSpeechRecognizer(locale: locale)
    
                recognitionTask?.cancel()
                recognitionTask = nil
    
                try audioSession.setCategory(.record, mode: .measurement, options: .duckOthers)
                try audioSession.setActive(true, options: .notifyOthersOnDeactivation)
    
                guard let recognizer = speechRecognizer, recognizer.isAvailable else {
                    transcribedText = "Reconocimiento de voz no disponible para el idioma seleccionado."
                    return
                }
                
                let inputNode = audioEngine.inputNode
                let recordingFormat = inputNode.outputFormat(forBus: 0)
                inputNode.installTap(onBus: 0, bufferSize: 1024, format: recordingFormat) { buffer, when in
                    self.recognitionRequest.append(buffer)
                }
                
                audioEngine.prepare()
                try audioEngine.start()
                
                recognitionTask = recognizer.recognitionTask(with: recognitionRequest) { result, error in
                    if let result = result {
                        self.transcribedText = result.bestTranscription.formattedString
                    }
                }
                
                isRecording = true
            } catch {
                transcribedText = "Error al iniciar la grabación: \(error.localizedDescription)"
            }
        }
        
        func stopRecording() {
            audioEngine.stop()
            audioEngine.inputNode.removeTap(onBus: 0)
            recognitionRequest.endAudio()
            recognitionTask?.cancel()
            isRecording = false
        }
    }

    Key Components

    1. Properties:

      • @Published var transcribedText: Holds the real-time transcribed text, allowing SwiftUI views to bind and update dynamically.
      • @Published var isRecording: Indicates whether the application is currently recording.
      • audioRecorder, audioSession, recognitionRequest, recognitionTask, audioEngine, speechRecognizer: These manage audio recording and speech recognition.
    2. Speech Recognition Workflow:

      • SFSpeechRecognizer: Recognizes and transcribes speech from audio input for a specified locale.
      • SFSpeechAudioBufferRecognitionRequest: Provides an audio buffer for speech recognition tasks.
      • AVAudioEngine: Captures microphone input.

    Conclusions

    I aim you that you download the project  from following github repositoryand start to play with such great techology.

    References

    • Speech

      Apple Developer Documentation

  • iOS start up sequencer pattern

    iOS start up sequencer pattern

    In mobile native apps (iOS/Android), it is quite common to execute a series of tasks before the app is ready for the user. These tasks might include checking if the app requires an update, fetching remote app configurations, presenting the «What’s New» information for the latest release, and requesting user login if the user is not already logged in. All of this needs to be done as quickly as possible, often with animations playing to keep the user engaged during the wait.

    This post introduces what I call the sequencer pattern. By leveraging NSOperation, we can encapsulate each task into a self-contained unit and define dependencies among them. This approach establishes the initial execution order of the tasks. An added advantage is that when two or more tasks have no dependencies, iOS can execute them in parallel, further reducing startup times.

    Adding splash screen

    The first task we will add is responsible for presenting the splash screen. First, we will modify the ContentView.

    struct ContentView: View {
        @StateObject var sequencer = appSingletons.sequencer
        var body: some View {
            if sequencer.isDone {
                HomeView()
            } else {
                sequencer.currentView
            }
        }    
    }

    Sequencer at the end is another singleton, but gathered in a global structure. I explain the benefits of this aproach in the post Safely gathering singletons while avoiding data races. And then basically while sqeuencer has not finished (!sequencer.isDone) is the responsible for providing view depending on task executed. When is done then is delegated whole view hierarchy to HomeView.

    Let’s see what is on Sequencer:

    final class Sequencer: ObservableObject {
        @MainActor
        @Published var isDone: Bool = false
    
        @MainActor
        @Published var currentView: AnyView = AnyView(Text("Initial View"))
    
        @MainActor
        func updateView(to newView: AnyView) {
            currentView = newView
        }
    
        @MainActor
        static let shared = Sequencer()
    
        fileprivate let operationQueue = OperationQueue()
    
        private init() { }
    
        @MainActor
        func start() {
            Task {
                await self.regularInitialSequence()
            }
        }
    
        @GlobalManager
        func regularInitialSequence() {
            let presentSplashOperation = PresentSplashOperation()
            let operations = [presentSplashOperation]
            
            // Add operation dependencies
    
            operationQueue.addOperations(operations, waitUntilFinished: false)
        }
    
        func cancel() {
            operationQueue.cancelAllOperations()
        }
    }

    The Sequencer is an ObservableObject that publishes the current view associated with any task, as well as its readiness status. The start method creates tasks and initiates their execution. Currently, only the splash view task is being executed.

    The PresentSplashOperation performs the following functions:

        override func main() {
            os_log("Start: PresentSplashOperation", log: log, type: .debug)
            Task { @MainActor in
                Sequencer.shared.updateView(to: AnyView(SequencerView()))
            }
            sleep(5)
            os_log("End: PresentSplashOperation", log: log, type: .debug)
            self.state = .Finished
            Task { @MainActor in
                Sequencer.shared.isDone = true
            }
        }

    Provides the view to be displayed while the PresentingSplashOperation is being executed. Afterward, there is a delay of 5 seconds before marking the task as finished. Once completed:

    1. isDone is set to true, allowing view control to transition to ContentView and present HomeView.
    2. self.state is set to .Finish, enabling the NSOperations engine to execute the next task, if another operation depends on this one to start.

    To initiate the process, simply call the start method from the sequencer to begin the sequence.

    @main
    struct SequencerPatternApp: App {
        var body: some Scene {
            WindowGroup {
                ContentView()
                    .task {
                    appSingletons.sequencer.start()
                }
            }
        }
    }

    Build and run on a simulator or real device, and the result should be:

    What’s new screen

    It is quite common that whenever there is an app software update introducing new user features, a page viewer is displayed once to showcase what’s new in the app. First of all, let’s set the app version in a centralized location, as explained in Force update iOS Apps when… post:

    Then we are going to implement a task that carries on this task:

    @GlobalManager
    final class WhatsNewOperation: ConcurrentOperation, @unchecked Sendable {
        
        
        override init() {
            super.init()
        }
    
        @MainActor
        func WhatsNewView() -> some View {
            VStack {
                HStack {
                    Spacer()
                    Button {
                        Sequencer.shared.isDone = true
                        self.state = .Finished
                    } label: {
                        Image(systemName: "xmark")
                            .font(.system(size: 20, weight: .bold))
                            .foregroundColor(.white)
                            .frame(width: 40, height: 40)
                            .background(Color.red)
                            .clipShape(Circle())
                            .shadow(radius: 5)
                    }
                }
               // Spacer()
                TabView{
                    VStack {
                        Text("What's new feature A")
                    }
                    VStack {
                        Text("What's new feature B")
                    }
                    VStack {
                        Text("What's new feature C")
                    }
                }
                .font(.system(size: 20, weight: .bold))
                .tabViewStyle(.page)
                .indexViewStyle(.page(backgroundDisplayMode: .always))
            }
            .padding()
        }
        
        override func main() {
            @AppStorage("appVersion") var appVersion = "0.0.0"
            
            os_log("Start: WhatsNewOperation", log: log, type: .debug)
            let marketingVersion = Bundle.main.infoDictionary?["CFBundleShortVersionString"] as? String ?? ""
            let isLatest = appVersion == marketingVersion
            if !isLatest {
                appVersion = marketingVersion
                Task { @MainActor in
                    Sequencer.shared.updateView(to: AnyView(WhatsNewView()))
                }
            } else {
                self.state = .Finished
                Task { @MainActor in
                    Sequencer.shared.isDone = true
                }
            }
            os_log("End: WhatsNewOperation", log: log, type: .debug)
        }
    }
     

    We fetch the appVersion from the App Store (via UserDefaults, as implemented previously). This is compared against the current app version stored in the project configuration (MARKETING_VERSION). If the versions differ, a «What’s New» view is presented. After this, the new MARKETING_VERSION value is stored in AppStorage.

    An important note: the last task in the sequencer is now WhatsNewOperation. As a result, this operation is responsible for setting Sequencer.shared.isDone to true. PresentSplashOperation is no longer responsible for setting this flag. Be sure to remove any code in PresentSplashOperation that sets this flag; otherwise, HomeView will be presented as soon as PresentSplashOperation finishes.

        override func main() {
            os_log("Start: PresentSplashOperation", log: log, type: .debug)
            Task { @MainActor in
                Sequencer.shared.updateView(to: AnyView(SequencerView()))
            }
            sleep(5)
            os_log("End: PresentSplashOperation", log: log, type: .debug)
            self.state = .Finished
    //        Task { @MainActor in
    //            Sequencer.shared.isDone = true
    //        }
        }

    Look out! The self.state = .Finished remains untouched. Now, this will allow the NSOperation engine to process the next operation (PresentSplashOperation). It is now time to create a new operation, set its dependencies, and update the regularInitialSequence() method.

        @GlobalManager
        func regularInitialSequence() {
            let presentSplashOperation = PresentSplashOperation()
            let whatsNewOperation = WhatsNewOperation()
            
            // DO NOT FORGET ADD OPERATION IN operations array. XDDDDD
            let operations = [presentSplashOperation,
                              whatsNewOperation]
            
            // Add operation dependencies
            whatsNewOperation.addDependency(presentSplashOperation)
            
            operationQueue.addOperations(operations, waitUntilFinished: false)
        }

    Add a new WhatsNewOperation() to the operations array. It’s important to set the whatsNewOperation to depend on the completion of the presentSplashOperation.

    Build and run. The expected result should be:

    The ‘What’s New’ section is displayed only once upon the app’s first startup and does not appear on subsequent launches.

    Force update

    We are now going to insert a force update operation between the previous steps. Specifically, the sequence will be: PresentSplash, followed by ForceUpdateOperation, and then What’s New.

    The implementation of the force update operation is as follows:

    @GlobalManager
    final class ForceUpdateOperation: ConcurrentOperation, @unchecked Sendable {
    
        override init() {
            super.init()
        }
    
        @MainActor
        func ForceUpdateRequiredView() -> some View {
            VStack {
              //  ProgressView()
                Text("Software Update Required!!!")
                    .font(.largeTitle)
                    .fontWeight(.bold)
                Button("Download it from Apple Store...") {}
                    .buttonStyle(.borderedProminent)
            }
                .padding()
        }
    
        override func main() {
            let required = true
            os_log("Start: ForceUpdateOperation", log: log, type: .debug)
            sleep(5)
            if required {
                Task { @MainActor in
                    Sequencer.shared.updateView(to: AnyView(ForceUpdateRequiredView()))
                }
            } else {
                self.state = .Finished
            }
            os_log("End: ForceUpdateOperation", log: log, type: .debug)
        }
    }

    To emulate behavior, we initially included a 5-second sleep. Using a hardcoded flag, we determined whether a force update was required.

    Now that we have a long-running operation, we can remove the sleep delay in the PresentSplash operation.

        override func main() {
            os_log("Start: PresentSplashOperation", log: log, type: .debug)
            Task { @MainActor in
                Sequencer.shared.updateView(to: AnyView(SequencerView()))
            }
    //        sleep(5)
            os_log("End: PresentSplashOperation", log: log, type: .debug)
            self.state = .Finished
    //        Task { @MainActor in
    //            Sequencer.shared.isDone = true
    //        }
        }
    }

    It’s time to reorganize operations. Open the Sequencer and update the regularInitialSequence method.

        @GlobalManager
        func regularInitialSequence() {
            let presentSplashOperation = PresentSplashOperation()
            let forceUpdateOperation = ForceUpdateOperation()
            let whatsNewOperation = WhatsNewOperation()
            
            // DO NOT FORGET ADD OPERATION IN operations array. XDDDDD
            let operations = [presentSplashOperation,
                              forceUpdateOperation,
                              whatsNewOperation]
            
            // Add operation dependencies
            forceUpdateOperation.addDependency(presentSplashOperation)
            whatsNewOperation.addDependency(forceUpdateOperation)
            
            operationQueue.addOperations(operations, waitUntilFinished: false)
        }

    Simply add a new ForceUpdateOperation to the operations array and reorganize the operation dependencies. The WhatsNewOperation should depend on the ForceUpdateOperation, and the ForceUpdateOperation should depend on the PresentSplashOperation.

    After making these changes, build and run the application.

    I will now set the required flag in the ForceUpdateOperation to false, so it doesn’t block the app startup sequence. We will then review the logs to assess the execution sequence of the operations.

    Fetch configuration

    Up until now, we have been sequencing operations, but sometimes it is possible to parallelize operations to reduce startup sequence time. In this case, we have created a simulated FetchConfiguration operation:

    @GlobalManager
    final class FetchConfigurationOperation: ConcurrentOperation, @unchecked Sendable {
    
        override init() {
            super.init()
        }
    
        override func main() {
            let required = true
            os_log("Start: FetchConfigurationOperation", log: log, type: .debug)
            sleep(8)
            self.state = .Finished
            os_log("End: FetchConfigurationOperation", log: log, type: .debug)
        }
    }

    To emulate the behavior, we initially included an 8-second sleep. This operation will be executed in parallel with the Force Update operation. Let’s create the operation and add its dependencies.

        @GlobalManager
        func regularInitialSequence() {
            let presentSplashOperation = PresentSplashOperation()
            let forceUpdateOperation = ForceUpdateOperation()
            let fetchConfigurationOperation = FetchConfigurationOperation()
            let whatsNewOperation = WhatsNewOperation()
            let operations = [presentSplashOperation,
                              forceUpdateOperation,
                              fetchConfigurationOperation,
                              whatsNewOperation]
            
            // Add operation dependencies
            forceUpdateOperation.addDependency(presentSplashOperation)
            
            fetchConfigurationOperation.addDependency(presentSplashOperation)
            
            whatsNewOperation.addDependency(forceUpdateOperation)
            whatsNewOperation.addDependency(fetchConfigurationOperation)
    
            operationQueue.addOperations(operations, waitUntilFinished: false)
        }

    Create a FetchConfigurationOperation and add it to the operations array. Ensure that it has the same dependencies as the ForceUpdateConfiguration operation. Additionally, the WhatsNewOperation must also depend on FetchConfiguration.

    Build the project, run the operation, and review the logs.

    ForceUpdateOperation and FetchConfiguration start simultaneously, and it is only when FetchConfiguration finishes that the WhatsNewOperation is executed.

    Conclusions

    I have used this pattern in two real production iOS projects with reasonable success, and I encourage you to try it out in your personal projects. You can find the codebase used to write this post in this repository.

  • DebugSwift: Streamline Your Debugging Workflow

    DebugSwift: Streamline Your Debugging Workflow

    Developing an iOS app using DebugSwift is highly beneficial, as it provides powerful debugging tools specifically designed for Swift developers. This tool simplifies the debugging process by offering an intuitive interface to inspect variables, view complex data structures, and debug Swift code more efficiently. By making runtime debugging more accessible and improving code visibility during execution, DebugSwift helps reduce development time and is especially valuable for resolving issues in complex Swift applications.

    In this post, we will demonstrate how to configure the tool, track API REST service calls, and explore some additional utilities.

    Base project


    Here’s a revised version of your text for improved clarity, grammar, and flow:


    The base code for this project is a straightforward iOS list-detail application. It makes a request to the Rick and Morty API to retrieve character information and fetches their corresponding images. It’s as simple as that:

    output

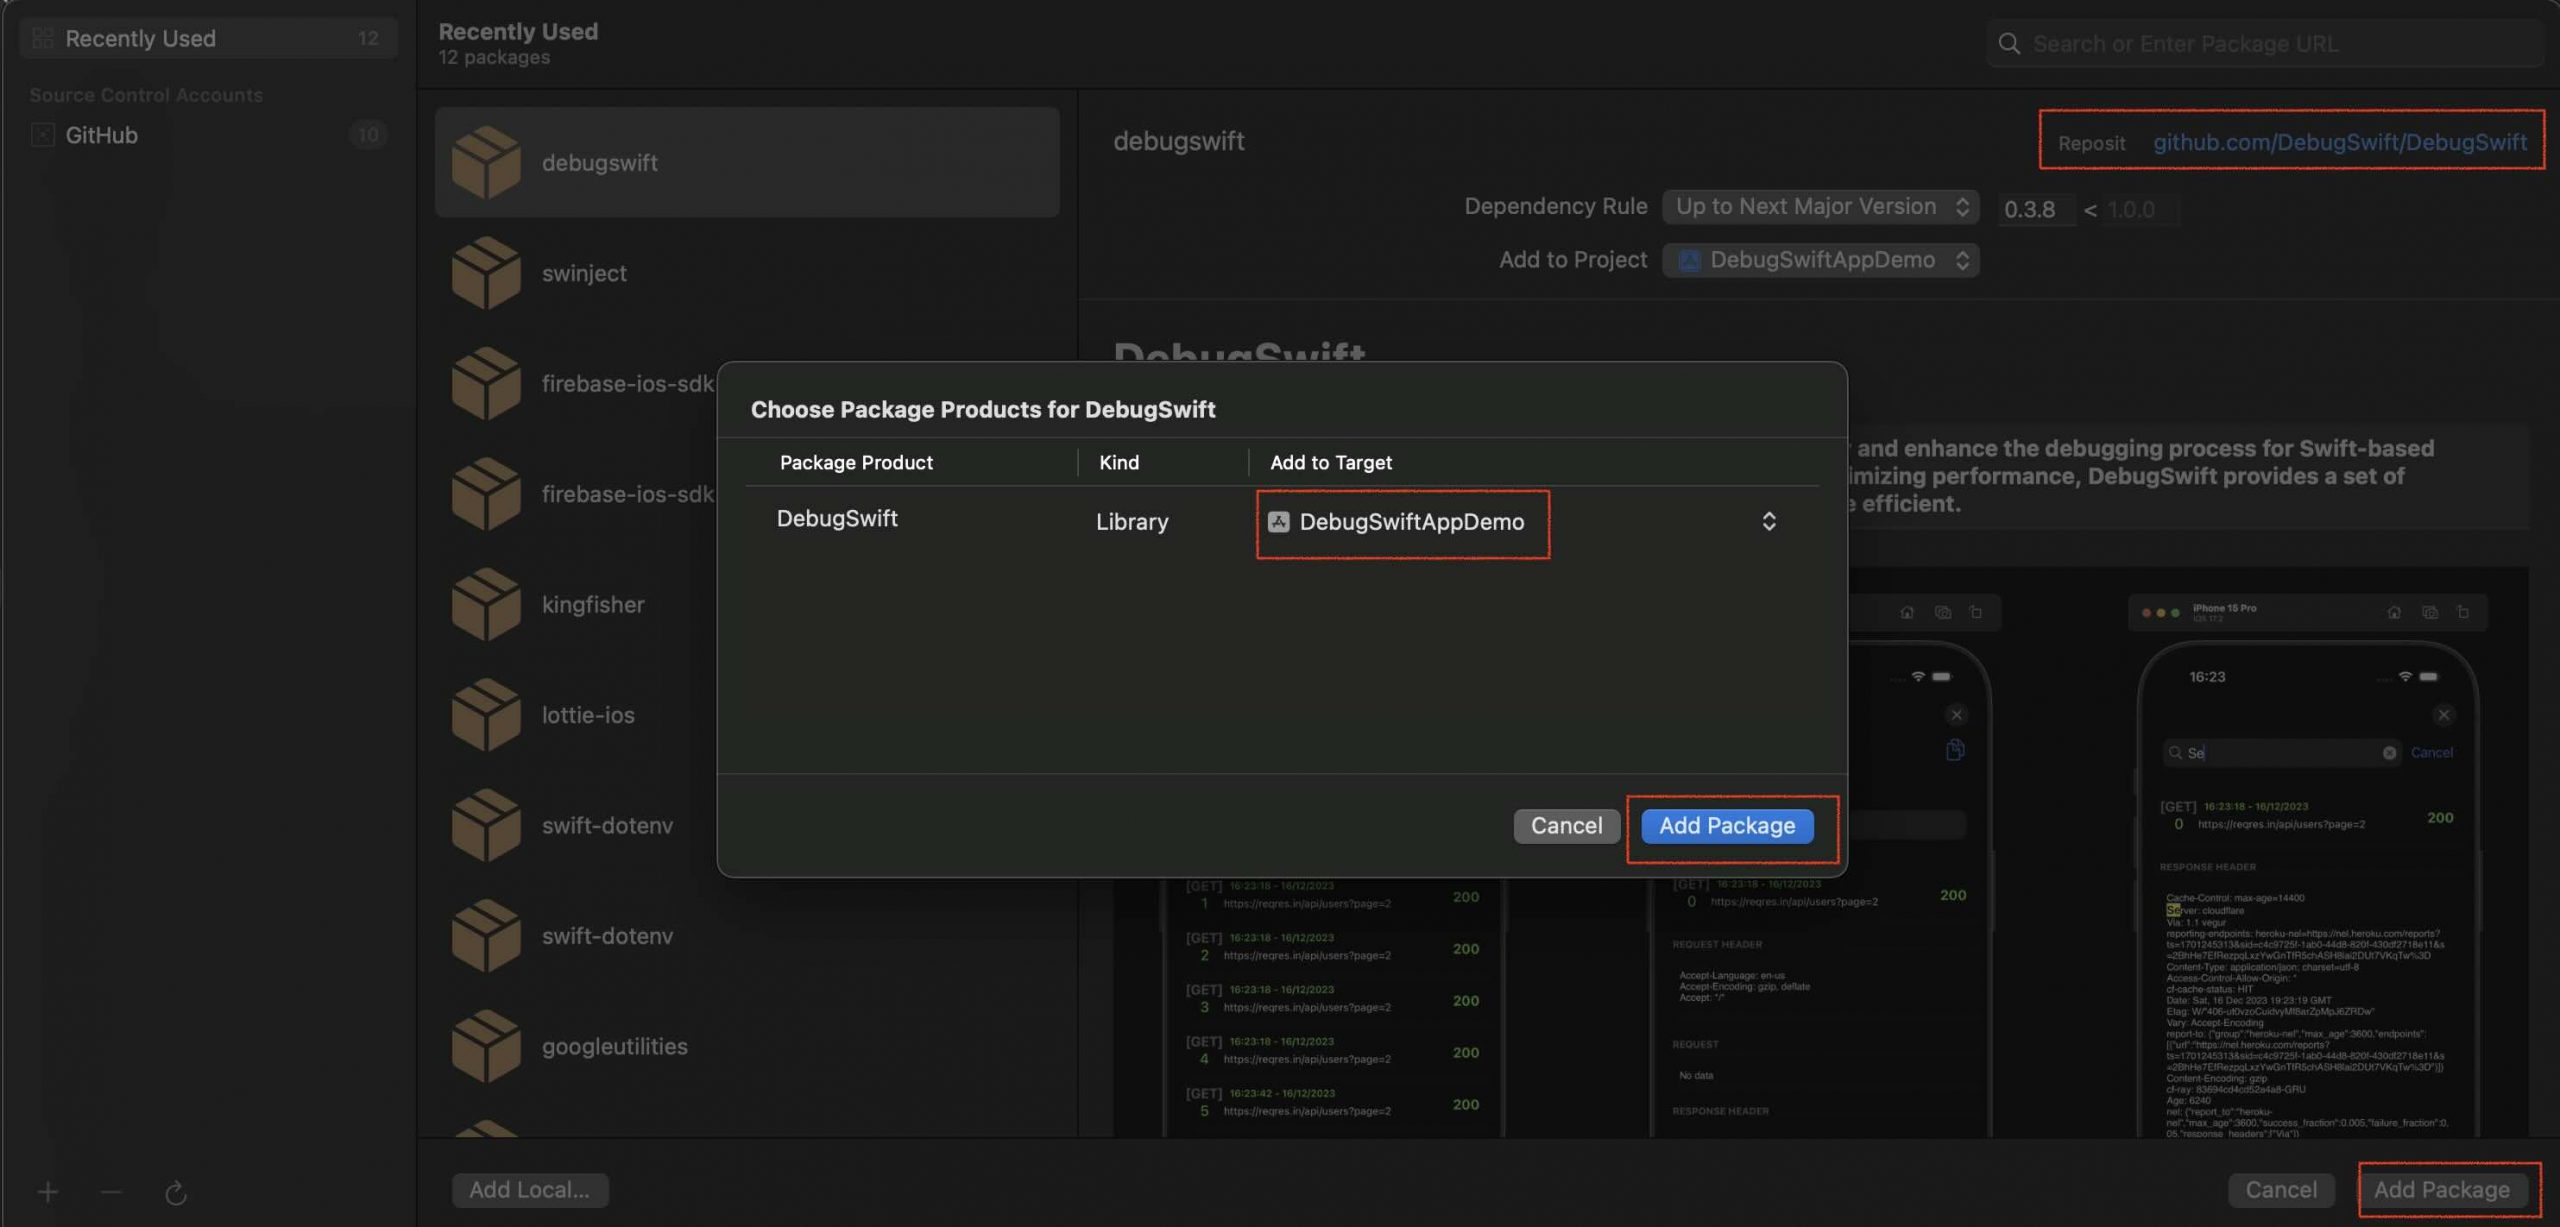
    For installing DebugSwift SPM package just go to project settings, package dependencies: 

    Screenshot

    We need a sample user gesture to trigger the tool, the most common event is shake, so we will creat a new modifier for controlling this event on any view:

    import SwiftUI
    #if DEBUG
        import DebugSwift
    #endif
    
    @main
    struct DebugSwiftAppDemoApp: App {
    
        var body: some Scene {
            WindowGroup {
                CharacterView()
                    .onAppear {
                    #if DEBUG
                        setupDebugSwift()
                    #endif
                }
                .onShake {
                    #if DEBUG
                        DebugSwift.show()
                    #endif
                }
            }
        }
    
        fileprivate func setupDebugSwift() {
            DebugSwift
                .setup()
            // MARK: - Enable/Disable Debugger
            DebugSwift.Debugger.logEnable = true
            DebugSwift.Debugger.feedbackEnable = true
        }
    }

    This SwiftUI app integrates the DebugSwift framework for debugging purposes, enabled only in DEBUG mode. It displays a CharacterView in its main scene and includes features for debugging during development. When the view appears, it initializes the DebugSwift setup, enabling logging and user feedback. Additionally, a shake gesture triggers the display of the DebugSwift debugging interface, offering developers a quick way to access debugging tools.

    The use of conditional compilation (#if DEBUG) ensures that all DebugSwift functionality is included only in development builds and excluded from production (RELEASE mode). This approach allows for powerful debugging capabilities during development while maintaining a clean and secure production build.

    .onShake is a custom modifier that executes an action when a shake event is detected. The focus of this post is not to explain its implementation, but you can find a link to the repository at the end of the post.


    Let’s debug…

    All setup is ready, if you deployed:

    • On a real device, just share once the app is presente.
    • On simulator, Simulator, Device, Shake:


    It will appear an small button at the center left of the screen:

    The number «21» displayed in the middle of the button represents the total number of API requests made so far. You can perform either a short press or a long press on the button. A long press opens the Debug View Hierarchy, which will be discussed in the upcoming sections, specifically in the context of using a device or simulator. For now, just perform a short press.

    Network

    The first screen presented is the Network view, which I personally use the most. It allows you to review API requests and responses, making it easier to determine whether a communication issue originates upstream (backend), downstream (frontend), or even both!

    This is the ordered list of requests made by the app. The first request retrieves the characters, while the subsequent ones primarily fetch the .jpeg images for these characters. If we tap on the first element:

    We can see detailed API headers, request, response, response times, and more. On the navigation bar, from left to right, there are three interesting options:

    1. Share this information
    2. Get the cURL command to execute the same request in the command line:
      bash:
      curl -X GET -H "" -d "" https://rickandmortyapi.com/api/character
    3. Copy this information to paste elsewhere.

    Performance

    It allows you to monitor CPU usage, memory usage, frames per second, and memory leaks in real-time.

    User interface

    There are many utilities related to the user interface, such as:

    • Colorized view borders (as shown in the picture below)
    • Slow animations
    • Show touches
    • Switch to dark mode

    There is also a grid overlay utility that displays a grid, which can be quite useful for adjusting margins. In the screenshot below, I have set the grid to 20×20:

    App resources

    Is possible also review app resources, such as:

    • App folders (Document,  Library, SystemData, tmp) and its files
    • App user defalts
    • App secured data stored in Keychain

    Extend debug tool

    You heard well you can extend, the tool for presentin specific information from current App,  impelemnting actions that are specific on your app. In configuration section is where  the magic takes place:

    fileprivate func setupDebugSwift() {
            DebugSwift
                .setup()
            // MARK: - Custom Info
    
            DebugSwift.App.customInfo = {
                [
                        .init(
                        title: "Info 1",
                        infos: [
                                .init(title: "title 1", subtitle: "subtitle 1")
                        ]
                    )
                ]
            }
    
            // MARK: - Custom Actions
    
            DebugSwift.App.customAction = {
                [
                        .init(
                        title: "Action 1",
                        actions: [
                                .init(title: "action 1") { // [weak self] in
                                print("Action 1")
                            }
                        ]
                    )
                ]
            }
    
            // MARK: Leak Detector
    
            DebugSwift.Performance.LeakDetector.onDetect { data in
                // If you send data to some analytics
                print(data.message)
            }
    
            // MARK: - Custom Controllers
    
             DebugSwift.App.customControllers = {
                 let controller1 = UITableViewController()
                 controller1.title = "Custom TableVC 1"
    
                 let controller2 = UITableViewController()
                 controller2.title = "Custom TableVC 2"
    
                 return [controller1, controller2]
             }
    
            // MARK: - Enable/Disable Debugger
            DebugSwift.Debugger.logEnable = true
            DebugSwift.Debugger.feedbackEnable = true
        }

    This is presented in the following way:

    If your custom debug data is too complex, you can dedicate an entire view to it:

    Just one more thing…

    I mentioned at the beginning that you can also perform a long press after shaking to trigger the DebugSwift tool interface. Please try it now. You should see the View Hierarchy:

    But also Debug View Hierarchy:

    Conclusions

    I hope that you have enjoyed same as me discovering succh useful tool. You can find the source code used in this post in the following repository.

    References

  • Force Update iOS Apps When Backend Require It

    Force Update iOS Apps When Backend Require It

    In the mobile native (iOS/Android) app production ecosystem, multiple frontend versions often coexist and interact with the same backend. Frontend updates are typically adopted gradually; while it’s possible to enforce an update, this approach is generally considered disruptive and is used only in exceptional circumstances.

    This post aims to demonstrate a method for controlling request responses based on the frontend version specified in the request. The backend implementation will use Vapor, and the frontend will be an iOS app. Links to the GitHub repositories hosting the source code are provided at the end of this post.

    Keep request under control

    Including the client’s frontend version in backend requests is crucial for several reasons:

    1. Version-Specific Responses: The backend can tailor its responses to ensure compatibility and optimal functionality for each frontend version.

    2. API Versioning: It helps the backend serve the appropriate API version, supporting backward compatibility while enabling updates and improvements.

    3. Feature Support: Frontend versions may differ in their feature sets. The backend can adjust responses to include or exclude functionality based on the client’s capabilities.

    4. Performance Optimization: Backend processing and payloads can be optimized for the specific requirements of each frontend version, improving system performance.

    5. Error Handling: Knowing the frontend version allows for more relevant error messages and effective resolution of version-specific issues.

    6. Security Enhancements: Version-specific security protocols or restrictions can be implemented, boosting system security.

    By including the frontend version in client requests, developers can build robust, efficient, and maintainable systems that adapt to evolving requirements while maintaining compatibility with legacy clients.

    Vapor backend

    Vapor is an open-source web framework written in Swift, designed for building server-side applications. It offers a powerful and asynchronous platform for developing web applications, APIs, and backend services, all using Swift as the server-side language.

    This post is not a «build your first server-side app» tutorial. However, don’t worry—at the end of the post, I’ll share the tutorials I followed to gain a deeper understanding of this technology.

    To get started, we’ll create a new Vapor project. For this project, we won’t be working with databases, so you can safely answer «No» to all related prompts during the setup process.

    We will create an endpoint specifically for checking the minimum required versions compatible with the backend and determining whether a forced update is necessary. The endpoint will use the GET method, and the path will be /minversion.

    struct MainController: RouteCollection {
        func boot(routes: any Vapor.RoutesBuilder) throws {
            let minversionRoutesGrouped = routes.grouped("minversion")
            minversionRoutesGrouped.get(use: minVersion)

    And the associated function to perform this will be as follows.

        @Sendable
        func minVersion(req: Request) async throws -> VersionResponse {
            
            let currentVersion = "2.0.0"
            let minimumVersion = "1.5.0"
            let forceUpdate = true // o false dependiendo de la lógica de negocio
    
            // Devuelve la respuesta como JSON
            return VersionResponse(
                currentVersion: currentVersion,
                minimumVersion: minimumVersion,
                forceUpdate: forceUpdate
            )
        }

    Structure: We need to include the following information:

    1. Minimal Version: The minimum version of the application that the backend can handle.
    2. Current Version: The current version supported by the backend.
    3. Force Update: Whether a forced update is required.

    Instructions:
    Run the project, and check the log console to confirm that the server is ready.

    Use the curl command to call the specified endpoint.

    The API returns a JSON object containing the minimum and current versions, as well as a force-update flag.

    To simplify the backend’s ability to check frontend versions, we will add an additional attribute to each endpoint. This attribute will provide information about the frontend version. To illustrate this approach, we will create a sample POST endpoint that includes this feature.

    struct MainController: RouteCollection {
        func boot(routes: any Vapor.RoutesBuilder) throws {
            let minversionRoutesGrouped = routes.grouped("minversion")
            minversionRoutesGrouped.get(use: minVersion)
            
            let sampleRoutesGrouped = routes.grouped("sample")
            sampleRoutesGrouped.post(use: sample)
        }
    And its functionality is encapsulated in the following endpoint.
        @Sendable
        func sample(req: Request) async throws -> SampleResponse {
            let payload = try req.content.decode(SampleRequestData.self)
            let isLatestVersion =  await payload.version == VersionResponse.current().currentVersion
            let isForceUpdate = await VersionResponse.current().forceUpdate
            guard  isLatestVersion ||
                   !isForceUpdate else {
                throw Abort(.upgradeRequired) // Force update flag set
            }
    
            guard await isVersion(payload.version, inRange: (VersionResponse.current().minimumVersion, VersionResponse.current().currentVersion)) else {
                throw Abort(.upgradeRequired) // Version out of valid range
            }
            
            return SampleResponse(data: "Some data...")
        }

    The first thing the function does is validate that the version adheres to the X.Y.Z syntax.

        struct SampleRequestData: Content {
            let version: String
            
            mutating func afterDecode() throws {
                guard isValidVersionString(version) else {
                    throw Abort(.badRequest, reason: "Wrong version format")
                }
            }
            
            private func isValidVersionString(_ version: String) -> Bool {
                let versionRegex = #"^\d+\.\d+\.\d+$"#
                let predicate = NSPredicate(format: "SELF MATCHES %@", versionRegex)
                return predicate.evaluate(with: version)
            }
        }

    Later on, the process involves validating the version of a client application against a server-defined versioning policy. If the version check is successful, a simple JSON response with sample data is returned.

    Returning to the command line, we execute the sample using valid version values:

    We received a valid sample endpoint response, along with current, minimum version and wether forced update is being required.

    However, when we set a version lower than the required minimum, we encountered an error requesting an upgrade.

    While the implementation is theoretically complete, handling version updates on the front end is not difficult, but any mistakes in production can have dramatic consequences. For this reason, it is mandatory to implement a comprehensive set of unit tests to cover the implementation and ensure that when versions are updated, consistency is maintained.

    From now on, every new endpoint implemented by the server must perform this frontend version check, along with other checks, before proceeding. Additionally, the code must be data race-safe.

    At the time of writing this post, I encountered several issues while compiling the required libraries for Vapor. As a result, I had to revert these settings to continue writing this post. Apologies for the back-and-forth.

    IOS frontend

    The iOS app frontend we are developing will primarily interact with a sample POST API. This API accepts JSON data, which includes the current frontend version.

    • If the frontend version is within the supported range, the backend responds with the expected output for the sample POST API, along with information about the versions supported by the backend.
    • If the frontend version falls below the minimum supported version and a forced update is required, the backend will return an «update required» error response.

    To ensure compliance with Swift 6, make sure that Strict Concurrency Checking is set to Complete.

    … and Swift language version to Swift 6.

    Before we start coding, let’s set the app version. The version can be defined in many places, which can be quite confusing. Our goal is to set it in a single, consistent location.

    This is the unique place where you need to set the version number. For the rest of the target, we will inherit that value. When we set the version in the target, a default value (1.0) is already set, and it is completely isolated from the project. We are going to override this by setting MARKETING_VERSION to $(MARKETING_VERSION), so the value will be taken from the project’s MARKETING_VERSION.

    Once set, you will see that the value is adopted. One ring to rule them all.

    The application is not very complicated, and if you’re looking for implementation details, you can find the GitHub repository at the end of the post. Essentially, what it does is perform a sample request as soon as the view is shown.

    Make sure the Vapor server is running before launching the app on a simulator (not a real device, as you’re targeting localhost). You should see something like this:

    Simulator Screenshot - iPhone 16 Pro Max - 2024-12-05 at 12.05.23

    The current app version is 1.7.0, while the minimum supported backend version is 1.5.0, and the backend is currently at version 2.0.0. No forced update is required. Therefore, the UI displays a message informing users that they are within the supported version range, but it also indicates that an update to the latest version is available.

    Once we configure the Vapor backend to enforce a forced update:

            let versionResponse = VersionResponse(currentVersion: "2.0.0",
                                                  minimumVersion: "1.5.0",
                                                  forceUpdate: true)
            

    Re-run vapor server:

    Screenshot

    Re-run the app:

    Simulator Screenshot - iPhone 16 Pro Max - 2024-12-05 at 12.16.03

    The front-end needs to be updated, and users are required to update the app. Please provide a link to the Apple Store page for downloading the update.

    Conclusions

    In this post, I have demonstrated a method for versioning API communication between the backend and frontend. I acknowledge that my explanation of the implementation is brief, but you can find the backend and frontend repositories linked here.

    References

  • Safely Gathering Singletons While Avoiding Data Races

    Safely Gathering Singletons While Avoiding Data Races

    The text is clear and conveys the intended message effectively. However, it can be slightly refined for improved readability and flow. Here’s a polished version: In our previous post, we discussed migrating an app that uses a Singleton to Swift 6.0. In this post, we’ll focus on consolidating multiple multipurpose Singletons into a single access point. This approach simplifies unit testing by enabling the injection of mocked Singletons.

    Base project

    We begin where we left off in the iOS Location Manager: A Thread-Safe Approach post. In that post, we explained how to migrate a Location Manager. Now, we’ll create a new blank project, ensuring that the Swift testing target is included.

    The base code is the source code provided in the commented section of the post. At the end of the post, you will find a link to the GitHub repository. By reviewing its history, you can trace back to this point.

    At this stage, we will create a second singleton whose purpose is to manage a long-running background task.

    @globalActor
    actor GlobalManager {
        static var shared = GlobalManager()
    }
    
    protocol LongTaskManagerProtocol {
        @MainActor var isTaskDone: Bool { get }
        func doLongTask() async
    }
    
    @GlobalManager
    class LongTaskManager: ObservableObject, LongTaskManagerProtocol {
    
        @MainActor
        static let shared = LongTaskManager()
    
        @MainActor
        @Published var isTaskDone: Bool = false
        
        private var isTaskDoneInternal: Bool = false {
            didSet {
                Task {
                    await MainActor.run { [isTaskDoneInternal] in
                        isTaskDone = isTaskDoneInternal
                    }
                }
            }
        }
    
        #if DEBUG
        @MainActor
        /*private*/ init() {
        }
        #else
        @MainActor
        private init() {
        }
        #endif
        
        // MARK :- LongTaskManagerProtocol
        func doLongTask() async {
            isTaskDoneInternal = false
            print("Function started...")
            // Task.sleep takes nanoseconds, so 10 seconds = 10_000_000_000 nanoseconds
            try? await Task.sleep(nanoseconds: 10_000_000_000)
            print("Function finished!")
            isTaskDoneInternal = true
        }
    }

    Key Concepts at Work

    1. Actor Isolation:

      • Ensures thread safety and serializes access to shared state (isTaskDoneInternal) through GlobalManager.
      • @MainActor guarantees main-thread access for UI-related properties and tasks.
    2. SwiftUI Integration:

      • @Published with ObservableObject enables reactive UI updates.
    3. Encapsulation:

      • Internal state (isTaskDoneInternal) is decoupled from the externally visible property (isTaskDone).
    4. Concurrency-Safe Singleton:

      • The combination of @MainActor, @GlobalManager, and private init creates a thread-safe singleton usable across the application.
     
    We will now make minimal changes to ContentView to integrate and provide visibility for this new Singleton.
    struct ContentView: View {
        @StateObject private var locationManager = LocationManager.shared
        @StateObject private var longTaskManager = LongTaskManager.shared
        
        var body: some View {
            VStack(spacing: 20) {
                Text("LongTask is \(longTaskManager.isTaskDone ? "done" : "running...")")
               ...
            .onAppear {
                locationManager.checkAuthorization()
                
                
                Task {
                  await longTaskManager.doLongTask()
                }
            }
            .padding()
        }
    }

    Key Concepts at Work

    1. Singleton Reference:
      Use a singleton reference to the LongTaskManager.
      The @StateObject property wrapper ensures that any changes in LongTaskManager.isTaskDone automatically update the ContentView.

    2. LongTaskManager Execution Status:
      The longTaskManager.isTaskDone property determines the message displayed based on the execution status.

    3. Start Long Task:
      The .onAppear modifier is the appropriate place to invoke longTaskManager.doLongTask().

    4. Testing on a Real Device:
      Build and deploy the app on a real device (iPhone or iPad) to observe the long task execution. You’ll notice that it takes a while for the task to complete.

    All the Singletons came together at one location

    During app development, there may come a point where the number of Singletons in your project starts to grow uncontrollably, potentially leading to maintenance challenges and reduced code manageability. While Singletons offer advantages—such as providing centralized access to key functionality (e.g., Database, CoreLocation, AVFoundation)—they also have notable drawbacks:

    1. Global State Dependency: Code relying on a Singleton is often dependent on global state, which can lead to unexpected behaviors when the state is altered elsewhere in the application.
    2. Challenges in Unit Testing: Singletons retain their state across tests, making unit testing difficult and prone to side effects.
    3. Mocking Limitations: Replacing or resetting a Singleton for testing purposes can be cumbersome, requiring additional mechanisms to inject mock instances or reset state.

    To address these challenges, the following Swift code defines a struct named AppSingletons. This struct serves as a container for managing singletons, simplifying dependency injection and promoting better application architecture.

    import Foundation
    
    struct AppSingletons {
        var locationManager: LocationManager
        var longTaskManager: LongTaskManager
        
        init(locationManager: LocationManager = LocationManager.shared,
             longTaskManager: LongTaskManager = LongTaskManager.shared) {
            self.locationManager = locationManager
            self.longTaskManager = longTaskManager
        }
    }
     var appSingletons = AppSingletons()

    Ensure that singleton references are obtained from appSinglegons.

    struct ContentView: View {
        @StateObject private var locationManager = appSingletons.locationManager
        @StateObject private var longTaskManager = appSingletons.longTaskManager
        
        var body: some View {

    After performing a sanity check to ensure everything is working, let’s move on to the test target and add the following unit test:

    import Testing
    @testable import GatherMultipleSingletons
    
    struct GatherMultipleSingletonsTests {
    
        @Test @MainActor func example() async throws {
            let longTaskManagerMock = LongTaskManagerMock()
            appSingletons = AppSingletons(longTaskManager: longTaskManagerMock)
            #expect(appSingletons.longTaskManager.isTaskDone == false)
            await appSingletons.longTaskManager.doLongTask()
            #expect(appSingletons.longTaskManager.isTaskDone == true)
        }
    
    }
    
    final class LongTaskManagerMock: LongTaskManager {
        
        override func doLongTask() async {
            await MainActor.run {
                isTaskDone = true
            }
        }
    }
    The test verifies the behavior of a mock implementation of a singleton when performing a long task. It is likely part of verifying the integration between AppSingleton and LongTaskManager, ensuring that the singleton’s behavior matches expectations under controlled test conditions. By using the mock, the test becomes predictable and faster, avoiding the need for actual long-running logic.

    …Thread safe touch

    Now is time to turn  this code into a thread safe. Set Swift Concurrency Checking to Complete:

    … and Swift language version to Swift 6.

    The first issue we identified is that, from a non-isolated domain, the struct is attempting to access an isolated one (@MainActor). Additionally, appSingletons is not concurrency-safe because, as mentioned, it resides in a non-isolated domain.

    ContentView (@MainActor) is currently accessing this structure directly. The best approach would be to move the structure to an @MainActor-isolated domain.

    import Foundation
    
    @MainActor
    struct AppSingletons {
        var locationManager: LocationManager
        var longTaskManager: LongTaskManager
        
        init(locationManager: LocationManager = LocationManager.shared,
             longTaskManager: LongTaskManager = LongTaskManager.shared) {
            self.locationManager = locationManager
            self.longTaskManager = longTaskManager
        }
    }
    
    @MainActor var appSingletons = AppSingletons()

    This means that the LongTaskManager is executed only within the @MainActor. However, this isn’t entirely true. The part responsible for accessing shared attributes and updating the @Published property is executed under the @MainActor, but the part performing the heavy lifting runs in a @globalActor isolated domain.

    Conclusions

    In this post I have showed a way avoid Singleton discontrol, by gathering them in a global structure. You can find the source code used in this post in the following repository.

    References

  • iOS Location Managers: A Thread-Safe Approach

    iOS Location Managers: A Thread-Safe Approach

    The aim of this post is just to explain how to migrate any app that uses CoreLocation to Swift 6.0. First step will be create a simple app that presents current location and later on we will close the post with the migration.

    CoreLocation

    Core Location Framework Overview

    Core Location is an iOS framework that enables apps to access and utilize a device’s geographic location, altitude, and orientation. It provides robust services for location-based functionalities, leveraging device components such as Wi-Fi, GPS, Bluetooth, cellular hardware, and other sensors.

    Key Functionalities of Core Location:

    1. Location Services:
      • Standard Location Service: Tracks user location changes with configurable accuracy.
      • Significant Location Service: Provides updates for significant location changes.
    2. Regional Monitoring: Monitors entry and exit events for specific geographic regions.
    3. Beacon Ranging: Detects and tracks nearby iBeacon devices.
    4. Visit Monitoring: Identifies locations where users spend significant periods of time.
    5. Compass Headings: Tracks the user’s directional heading.
    6. Altitude Information: Supplies data about the device’s altitude.
    7. Geofencing: Enables the creation of virtual boundaries that trigger notifications upon entry or exit.

    iOS Location sample app:

    Create a new blank iOS SwiftUI APP.

    This Swift code defines a class named LocationManager that integrates with Apple’s Core Location framework to handle location-related tasks such as obtaining the user’s current coordinates and resolving the corresponding address. Below is a breakdown of what each part of the code does

    import Foundation
    import CoreLocation
    
    class LocationManager: NSObject, ObservableObject, CLLocationManagerDelegate {
        
        static let shared = LocationManager()
        
        private var locationManager = CLLocationManager()
        private let geocoder = CLGeocoder()
        
        @Published var currentLocation: CLLocationCoordinate2D?
        @Published var currentAddress: CLPlacemark?
        
        private override init() {
            super.init()
            locationManager.delegate = self
            locationManager.desiredAccuracy = kCLLocationAccuracyBest
        }
        
        func checkAuthorization() {
            switch locationManager.authorizationStatus {
            case .notDetermined:
                locationManager.requestWhenInUseAuthorization()
            case .restricted, .denied:
                print("Location access denied")
            case .authorizedWhenInUse, .authorizedAlways:
                locationManager.requestLocation()
            @unknown default:
                break
            }
        }
        
        func requestLocation() {
            locationManager.requestLocation()
        }
        
        func locationManager(_ manager: CLLocationManager, didFailWithError error: Error) {
            print("Failed to find user's location: \(error.localizedDescription)")
        }
        
        func locationManagerDidChangeAuthorization(_ manager: CLLocationManager) {
            checkAuthorization()
        }
    
        func locationManager(_ manager: CLLocationManager, didUpdateLocations locations: [CLLocation]) {
            if let location = locations.first {
                self.currentLocation = CLLocationCoordinate2D(latitude: location.coordinate.latitude,
                                                              longitude: location.coordinate.longitude)
                reverseGeocode(location: location)
            }
        }
        
        private func reverseGeocode(location: CLLocation) {
            geocoder.reverseGeocodeLocation(location) { [weak self] placemarks, error in
                if let placemark = placemarks?.first, error == nil {
                    self?.currentAddress = CLPlacemark(placemark: placemark)
                } else {
                    print("Error during reverse geocoding: \(error?.localizedDescription ?? "Unknown error")")
                }
            }
        }
    }
    

    Main Responsabilites and features:

    1. Singleton Pattern

      • The class uses a shared instance (LocationManager.shared) to provide a global access point.
      • The initializer (private override init()) is private to enforce a single instance.
    1. CoreLocation Setup

      • CLLocationManager: Manages location-related activities (e.g., obtaining current location, monitoring location updates).
      • CLGeocoder: Converts geographic coordinates to human-readable addresses (reverse geocoding).
    2. Published Properties

      • @Published: Allows properties (currentLocation and currentAddress) to trigger UI updates in SwiftUI whenever they change.
    3. Authorization Handling

      • Checks and requests location permissions (checkAuthorization()).
      • Responds to changes in authorization status (locationManagerDidChangeAuthorization).
    4. Requesting Location

      • requestLocation(): Asks CLLocationManager to fetch the current location.
    5. Delegate Methods

      • Handles success (didUpdateLocations) and failure (didFailWithError) when fetching the location.
      • Updates currentLocation with the retrieved coordinates.
      • Performs reverse geocoding to convert coordinates to a readable address (reverseGeocode(location:)).
    6. Reverse Geocoding

      • Converts a CLLocation into a CLPlacemark (e.g., city, street, country).
      • Updates currentAddress on success or logs an error if reverse geocoding fails.

    How it Works in Steps

    1. Initialization

      • The singleton instance is created (LocationManager.shared).
      • CLLocationManager is set up with a delegate (self) and a desired accuracy.
    2. Authorization

      • The app checks location permissions using checkAuthorization().
      • If permission is undetermined, it requests authorization (requestWhenInUseAuthorization()).
      • If authorized, it requests the user’s current location (requestLocation()).
    3. Location Fetch

      • When a location update is received, didUpdateLocations processes the first location in the array.
      • The geographic coordinates are stored in currentLocation.
      • The reverseGeocode(location:) method converts the location to an address (currentAddress).
    4. Error Handling

      • Location fetch errors are logged via didFailWithError.
      • Reverse geocoding errors are logged in reverseGeocode.

    Finally we’re are going to request some location data from content view:

    struct ContentView: View {
        @StateObject private var locationManager = LocationManager()
        
        var body: some View {
            VStack(spacing: 20) {
                if let location = locationManager.currentLocation {
                    Text("Latitude: \(location.latitude)")
                    Text("Longitude: \(location.longitude)")
                } else {
                    Text("Location not available")
                }
                
                if let address = locationManager.currentAddress {
                    Text("Name: \(address.name ?? "Unknown")")
                    Text("Town: \(address.locality ?? "Unknown")")
                    Text("Country: \(address.country ?? "Unknown")")
                } else {
                    Text("Address not available")
                }
                
                Button(action: {
                    locationManager.requestLocation()
                }) {
                    Text("Request Location")
                        .padding()
                        .background(Color.blue)
                        .foregroundColor(.white)
                        .cornerRadius(8)
                }
            }
            .onAppear {
                locationManager.checkAuthorization()
            }
            .padding()
        }
    }

    Last but not least be sure that ContentView is executing the view that we have just created. And be sure that you have a description for NSLocationWhenInUseUsageDescription setting.

    To run the app, ensure it is deployed on a real device (iPhone or iPad). When the app prompts for permission to use location services, make sure to select «Allow.»

    …Thread safe approach

    This is the Side B of the post—or in other words, the part where we save the thread! 😄 Now, head over to the project settings and set Strict Concurrency Checking to Complete.

    … and Swift language version to Swift 6.

    The first issue we identified is that the LocationManager is a singleton. This design allows it to be accessed from both isolated domains and non-isolated domains.

    In this case, most of the helper methods are being called directly from views, so it makes sense to move this class to @MainActor.

    @MainActor
    class LocationManager: NSObject, ObservableObject, CLLocationManagerDelegate {
     

    Now is the time to examine the data returned in the delegate methods. Our delegate methods do not modify the data, but some of them forward a copy of the received data. With our current implementation, this ensures that we avoid data races.

    In computer science, there are no «silver bullets,» and resolving issues when migrating from Swift 6 is no exception. When reviewing library documentation, if it is available, you should identify the specific domain or context from which the library provides its data. For Core Location, for instance, ensure that the CLLocationManager operates on the same thread on which it was initialized.

    We have a minimum set of guarantees to establish the protocol as @preconcurrency.

    @MainActor
    class LocationManager: NSObject, ObservableObject, @preconcurrency CLLocationManagerDelegate {
     

    At this point, we fulfill the Swift 6 strict concurrency check requirements. By marking the singleton variable as @MainActor, we fix both of the previous issues at once.

    class LocationManager: NSObject, ObservableObject, CLLocationManagerDelegate {
       
        @MainActor
        static let shared = LocationManager()
     

    Fixing migration issues is an iterative task. The more you work on it, the faster you can find a solution, but sometimes there is no direct fix. Build and deploy on a real device to ensure everything is working as expected.

    You can find the source code for this post in this repository.

    Conclusions

    In this post, you have seen how easy is to migrate CoreLocationManager

    References

  • Writing a Barcode Reader App in No Time

    Writing a Barcode Reader App in No Time

    There are other ways to input data into your application besides using a device’s keyboard. One such method is reading barcodes. In this post, I’ll demonstrate how easy it is to implement a solution for this functionality.

    AVCaptureMetadataOutput

    AVCaptureMetadataOutput is the class responsible for intercepting metadata objects from the video stream captured during a session. Part of the AVFoundation framework, its primary purpose is to detect and process metadata in real-time while capturing video.

    Key Characteristics of AVCaptureMetadataOutput:
    1. Code Detection:
      This class can detect various types of codes, such as QR codes and barcodes, including formats like EAN-8, EAN-13, UPC-E, Code39, and Code128, among others.

    2. Flexible Configuration:
      You can specify the types of metadata you want to capture using the metadataObjectTypes property. This provides granular control over the kind of information the system processes.

    3. Delegate-Based Processing:
      Metadata detection and processing are managed via a delegate object. This approach provides flexibility in handling the detected data and enables custom responses. However, note that working with this delegate often requires integration with the UIKit framework for user interface handling.

    4. Integration with AVCaptureSession:
      The AVCaptureMetadataOutput instance is added as an output to an AVCaptureSession. This setup enables real-time processing of video data as it is captured.

    Creating iOS App sample app

    Create a new blank iOS SwiftUI APP, and do not forget set Strict Concurrency Checking to Complete and Swift Language Versionto Swift 6

    As I mention on point 3 from past section, the pattern that implements AVCaptureMetadataOutput is deletage patterns, but we want our app that uses the latest and coolest SwiftUI framework. For fixing that we will need support of our old friend UIKit. Basically wrap UIKit ViewController into a UIViewControllerRespresentable, for being accessible from SwiftUI. And finally implement delegate inside UIViewControllerRespresentable.

    Create a new file called ScannerPreview and start writing following code:

    import SwiftUI
    import AVFoundation
    
    // 1
    struct ScannerPreview: UIViewControllerRepresentable {
        @Binding var isScanning: Bool
        var didFindBarcode: (String) -> Void = { _ in }
        // 2
        func makeCoordinator() -> Coordinator {
            return Coordinator(parent: self)
        }
        // 3
        func makeUIViewController(context: Context) -> UIViewController {
            let viewController = UIViewController()
            let captureSession = AVCaptureSession()
    
            // Setup the camera input
            guard let videoCaptureDevice = AVCaptureDevice.default(for: .video) else { return viewController }
            let videoDeviceInput: AVCaptureDeviceInput
    
            do {
                videoDeviceInput = try AVCaptureDeviceInput(device: videoCaptureDevice)
            } catch {
                return viewController
            }
    
            if (captureSession.canAddInput(videoDeviceInput)) {
                captureSession.addInput(videoDeviceInput)
            } else {
                return viewController
            }
    
            // Setup the metadata output
            let metadataOutput = AVCaptureMetadataOutput()
    
            if (captureSession.canAddOutput(metadataOutput)) {
                captureSession.addOutput(metadataOutput)
    
                metadataOutput.setMetadataObjectsDelegate(context.coordinator, queue: DispatchQueue.main)
                metadataOutput.metadataObjectTypes = [.ean13, .ean8, .pdf417, .upce, .qr, .aztec] // Add other types if needed
            } else {
                return viewController
            }
    
            // Setup preview layer
            let previewLayer = AVCaptureVideoPreviewLayer(session: captureSession)
            previewLayer.frame = viewController.view.layer.bounds
            previewLayer.videoGravity = .resizeAspectFill
            viewController.view.layer.addSublayer(previewLayer)
    
            captureSession.startRunning()
    
            return viewController
        }
    
        func updateUIViewController(_ uiViewController: UIViewController, context: Context) {
            // Here we can update the UI if needed (for example, stopping the session)
        }
    }

    To integrate a UIViewController into a SwiftUI View, import SwiftUI (for access to UIViewControllerRepresentable) and AVFoundation (for AVCaptureMetadataOutputObjectsDelegate).

    Key Features and Implementation
      1. UIViewControllerRepresentable Protocol
        Implementing the UIViewControllerRepresentable protocol allows a UIKit UIViewController to be reused within SwiftUI.

        • isScanning: This is a binding to the parent view, controlling the scanning state.
        • didFindBarcode: A callback function that is executed whenever a barcode is successfully scanned and read.
      2. Coordinator and Bridging

        • makeCoordinator: This method is required to fulfill the UIViewControllerRepresentable protocol. It creates a «bridge» (e.g., a broker, intermediary, or proxy) between the UIKit UIViewController and the SwiftUI environment. In this implementation, the Coordinator class conforms to the AVCaptureMetadataOutputObjectsDelegate protocol, which handles metadata detection and processing.
      3. Creating the UIViewController

        • makeUIViewController: Another required method in the protocol, responsible for returning a configured UIViewController.
          • Inside this method, the AVCaptureSession is set up to detect specific barcode formats (e.g., EAN-13, EAN-8, PDF417, etc.).
          • The configured session is added as a layer to the UIViewController.view.
        func updateUIViewController(_ uiViewController: UIViewController, context: Context) {
            // Here we can update the UI if needed (for example, stopping the session)
        }
        
        //1
        @MainActor
        class Coordinator: NSObject, @preconcurrency AVCaptureMetadataOutputObjectsDelegate {
            var parent: ScannerPreview
            
            init(parent: ScannerPreview) {
                self.parent = parent
            }
            // 2
            // MARK :- AVCaptureMetadataOutputObjectsDelegate
            func metadataOutput(_ output: AVCaptureMetadataOutput, didOutput metadataObjects: [AVMetadataObject], from connection: AVCaptureConnection) {
                // 4
                if let metadataObject = metadataObjects.first {
                    guard let readableObject = metadataObject as? AVMetadataMachineReadableCodeObject else { return }
                    guard let stringValue = readableObject.stringValue else { return }
                    AudioServicesPlaySystemSound(SystemSoundID(kSystemSoundID_Vibrate))
                    self.parent.isScanning = false
                    // 3
                    parent.didFindBarcode(String(stringValue))
                }
            }
        }

    Later, we will implement the Coordinator class, which must inherit from NSObject because it needs to conform to the AVCaptureMetadataOutputObjectsDelegate protocol, an extension of NSObjectProtocol.

    Key Features and Implementation:
    1. Swift 6 Compliance and Data Race Avoidance
      To ensure compliance with Swift 6 and avoid data races, the class is executed on @MainActor. This is necessary because it interacts with attributes from its parent, UIViewControllerRepresentable. Since AVCaptureMetadataOutput operates in a non-isolated domain, we’ve marked the class with @MainActor.

    2. Thread Safety
      Before marking AVCaptureMetadataOutputObjectsDelegate with @preconcurrency, ensure the following:

      • The metadataOutput.setMetadataObjectsDelegate(context.coordinator, queue: DispatchQueue.main) call is executed on the main thread (@MainActor).
      • This guarantees that when setting up AVCaptureMetadataOutput, it operates safely on the main thread.
    3. Data Handling
      The parent view receives a copy of the scanned barcode string. At no point does the delegate implementation modify the received data. This ensures thread safety and avoids potential data races.

    4. Protocol Method Implementation
      In the protocol method implementation:

      • Fetch the first object.
      • Retrieve the barcode value.
      • Update the scanning state.
      • Execute the callback function.

    By ensuring that no data is modified across different isolated domains, it is safe to proceed with marking the protocol with @preconcurrency.


    Final step is just implent the SwiftUI view where ScannerPreview view will be embeded. Create a new file called BarcodeScannerView and write following code:

    import SwiftUI
    import AVFoundation
    
    struct BarcodeScannerView: View {
        @State private var scannedCode: String?
        @State private var isScanning = true
        @State private var showAlert = false
        
        var body: some View {
            VStack {
                Text("Scan a Barcode")
                    .font(.largeTitle)
                    .padding()
    
                ZStack {
                    //1
                    ScannerPreview(isScanning: $isScanning,
                                   didFindBarcode: { value in
                        scannedCode = value
                        showAlert = true
                    }).edgesIgnoringSafeArea(.all)
    
                    VStack {
                        Spacer()
                        HStack {
                            Spacer()
                            if let scannedCode = scannedCode {
                                Text("Scanned Code: \(scannedCode)")
                                    .font(.title)
                                    .foregroundColor(.white)
                                    .padding()
                            }
                            Spacer()
                        }
                        Spacer()
                    }
                }
    
                if !isScanning {
                    Button("Start Scanning Again") {
                        self.isScanning = true
                        self.scannedCode = nil
                    }
                    .padding()
                    .background(Color.blue)
                    .foregroundColor(.white)
                    .cornerRadius(8)
                }
            }
            .onAppear {
                self.scannedCode = nil
                self.isScanning = true
            }
        }
    }
    Key Features and Implementation:
    1. Just place the preview in a ZStack and implment the callback to execute when the barcode is read.

    import SwiftUI
    
    struct ContentView: View {
        var body: some View {
            BarcodeScannerView()
        }
    }
    
    #Preview {
        ContentView()
    }
    

    Last but not least be sure that ContentView is executing the view that we have just created. And be sure that you have a description for NSCameraUsageDescription setting.

    Build and Run on real device

    For executing the app be sure that you deploy on a real device (iPhone or iPad). Whem the app ask you permission for using the camera, obviously say allow.

    Conclusions

    In this post, you have seen how easy it is to implement a barcode scanner using native libraries. You can find the working code used in this post in the following repository.

    References

  • Firebase Authentication in Your iOS App

    Firebase Authentication in Your iOS App

    User authentication is often a cumbersome task that becomes essential as an application grows more robust. Firebase Authentication simplifies this process by handling authentication for you. It supports several authentication methods, but for the purpose of this post, we will focus on email and password authentication.

    Firebase console

    The first step is to create a dashboard to manage your app’s Firebase capabilities. To do this, open the Firebase console and create a new project. Use the name of your app as the project name for better organization and clarity. For the purposes of this post, I will not enable analytics. With these steps completed, your project should be ready to use.

    Later on, we will revisit the setup-specific issues for your iOS app.

    Creating iOS App scaffolder

    Let’s set Firebase aside for a moment and create a blank application. The only important detail in this process is to pay attention to the Bundle Identifier, as we’ll need it in the upcoming steps.

    Connect Firebase to your app

    Return to Firebase to add it to your app, and select the iOS option

    This is the moment to enter your app’s iOS Bundle Identifier.

    The next step is to download the configuration file and incorporate it into your project.

    The final step is incorporating the Firebase SDK using Swift Package Manager (SPM). To do this, select your project, go to Package Dependencies, and click Add Package Dependency.

    Enter the GitHub repository URL provided in Step 3 of the Firebase configuration into the search input box.

    Don’t forget to add FirebaseAuth to your target application.

    Continue through the Firebase configuration steps, and it will eventually provide the code you need to connect your app to Firebase.

    Incorporate this code into your iOS app project, then build and run the project to ensure everything is working properly.

    Implement authentication

    Get back to Firebase console to set up Authentication

    As you can see, there are many authentication methods, but for the purpose of this post, we will only work with the email and password method.

    As you can see, there are many authentication methods, but for the purpose of this post, we will only focus on the email and password method.

    For this post, I have implemented basic views for user registration, login, logout, and password recovery. All authentication functionality has been wrapped into a manager called AuthenticatorManager. The code is very basic but fully functional and compliant with Swift 6.0.

    Don’t worry if I go too fast; the link to the code repository is at the end of this post. You’ll see that the code is very easy to read. Simply run the project, register an account, and log in.

    You can find the project code at following repository.

    Conclusions

    Firebase provides a fast and efficient way to handle user authentication as your app scales.

  • keepin’ secrets on your pillow

    keepin’ secrets on your pillow

    The aim of this post is to provide one of the many available methods for keeping secrets, such as passwords or API keys, out of your base code while still ensuring they are accessible during the development phase.

    .env file

    One common approach is to create a text file, usually named by convention as .env, although you are free to name it as you prefer. This file will contain the secrets of your project.

    This is a keep-it-out-of-version-control

    This is a medicine; keep out of reach of children version control system. So be sure that it is included in .gitignore.

    Commit and push changes asap:

    An important consideration is where to place the folder. It must be located in the same root directory where the source code begins.

    If you have already committed and pushed the changes, anyone with access to your repository could potentially access that data. You have two alternatives:

    • Use git rebase: With git rebase, you can modify your commit history, allowing you to remove the problematic commit. This is a cleaner approach but requires careful handling to avoid conflicts.
    • Create a new repository: This option will result in the loss of your commit history but can be simpler if preserving history is not essential.


    Additionally, remember that your .env file is only stored locally on your machine. Ensure you keep it secure to prevent sensitive information from being exposed.

    Lets play with XCode

    Create a blank app project in XCode and be sure that following settings are set:

    Swift Language version to Swift 6 and …

    Strict Concurrency Checking is set to Complete, ensuring that our code, in addition to being secure and preventing disclosure of sensitive information, will also be free from data races. Finally, create a new file with the following component.

    import Foundation
    
    @globalActor
    actor GlobalManager {
        static var shared = GlobalManager()
    }
    
    @GlobalManager final class Env {
        static let env: [String: String] = loadEnvVariables()
        static let filename = ".env"
        private init() {
        }
    
        static func fetch(key: String) -> String? {
            env[key]
        }
    
        static func loadEnvVariables() -> [String: String] {
            var envVariables: [String: String] = [:]
            guard let path = Bundle.main.path(forResource: filename, ofType: nil) else {
                return [:]
            }
            do {
                let content = try String(contentsOfFile: path, encoding: .utf8)
                let lines = content.components(separatedBy: .newlines)
                for line in lines {
                    let components = line.components(separatedBy: "=")
                    if components.count == 2 {
                        let key = components[0].trimmingCharacters(in: .whitespaces)
                        let value = components[1].trimmingCharacters(in: .whitespaces)
                        envVariables[key] = value
                    }
                }
            } catch {
                print("Error reading .env: \(error)")
            }
            return envVariables
        }
    }

    Finally, use the Env component to fetch secret data from the .env file.

    struct ContentView: View {
        @State private var apiKey: String?
        var body: some View {
            VStack {
                Image(systemName: "globe")
                    .imageScale(.large)
                    .foregroundStyle(.tint)
                Text("API_KEY:\(apiKey ?? "Not set")")
            }
            .padding()
            .onAppear {
                Task {
                    apiKey = await Env.fetch(key: "API_KEY")
                }
            }
        }
    }

    This is the default ContentView generated in a blank project. We have added content using the .onAppear() modifier to fetch the secret, which is displayed with a Text view. Run the project, and the final result is as follows:

    Screenshot

    Conclusions

    This is a safe way to keep your project secrets away from indiscreet eyes. However, your secret file is only stored locally in your (or the developer team’s) project folder. On this repository is the source code that I have used for writing this post.

  • Streamlining Your Xcode Projects with GitHub Actions

    Streamlining Your Xcode Projects with GitHub Actions

    Having good practices is one of the key points for successfully steering your project to completion, especially when working as part of a team. In this post, I will explain how to implement these tasks in a CI/CD environment such as GitHub.

    First, we will set up essential tasks like unit testing and linting locally, and then apply these tasks as requirements for integration approvals.

    Executing unit test through command line console

    At this point, we assume that the unit test target is properly configured in your project. This section is important because we will need to use the command in the future.»

    xcodebuild is a command-line tool provided by Apple as part of Xcode, it allows developers to build and manage Xcode projects and workspaces from the terminal, providing flexibility for automating tasks, running continuous integration (CI) pipelines, and scripting.

    Simply execute the command to validate that everything is working correctly.

    Linting your code

    Linting your code not only improves quality, prevents errors, and increases efficiency, but it also facilitates team collaboration by reducing time spent on code reviews. Additionally, linting tools can be integrated into CI pipelines to ensure that checks are part of the build and deployment process.

    The tool we will use for linting is SwiftLint. Here, you will find information on how to install it on your system. Once it is properly installed on your system:

    Go to project root folder and create file .swiftlint.yml, this is default configuration, you can check following link to know more about the defined rules.

    disabled_rules:
    - trailing_whitespace
    opt_in_rules:
    - empty_count
    - empty_string
    excluded:
    - Carthage
    - Pods
    - SwiftLint/Common/3rdPartyLib
    line_length:
        warning: 150
        error: 200
        ignores_function_declarations: true
        ignores_comments: true
        ignores_urls: true
    function_body_length:
        warning: 300
        error: 500
    function_parameter_count:
        warning: 6
        error: 8
    type_body_length:
        warning: 300
        error: 500
    file_length:
        warning: 1000
        error: 1500
        ignore_comment_only_lines: true
    cyclomatic_complexity:
        warning: 15
        error: 25
    reporter: "xcode"
    

    Now, let’s integrate this in Xcode. Select your target, go to Build Phases, click the plus (+) button, and choose ‘New Run Script Phase’.

    Rename the script name to ‘swiftlint’ for readability, and make sure to uncheck ‘Based on…’ and ‘Show environment…’.

    Paste the following script.

    echo ">>>>>>>>>>>>>>>>>>>>>>>> SWIFTLINT (BEGIN) >>>>>>>>>>>>>>>>>>>>>>>>>>>>>>"
    if [[ "$(uname -m)" == arm64 ]]; then
        export PATH="/opt/homebrew/bin:$PATH"
    fi
    
    if which swiftlint > /dev/null; then
      swiftlint
    else
      echo "warning: SwiftLint not installed, download from https://github.com/realm/SwiftLint"
    fi
    echo "<<<<<<<<<<<<<<<<<<<<<<<<< SWIFTLINT (END) <<<<<<<<<<<<<<<<<<<<<<<<<<<<<<<<"

    Select the target and build (Cmd+B). If you review the build log, you will see a new warnings triggered.

    GitHub actions

    GitHub Actions is a powerful CI/CD  platform integrated within GitHub, allowing developers to automate, customize, and streamline their software workflows directly from their repositories. It uses YAML configuration files to define tasks or workflows that run in response to events, such as pushing code, opening pull requests, or setting schedules. With its flexibility, developers can automate building, testing or deploying applications.

    Workflow for executing unit test

    At this point, we assume that we are in the root folder of a repository cloned from GitHub. Navigate to (or create) the following folder: ./github/workflows. In that folder, we will place our first GitHub Action for executing the unit tests. In my case, it was a file called UTest.yml with the following content:

    name: utests-workflow
    
    on:
      pull_request:
        branches: [main, develop]
    jobs:
      utests-job:
        runs-on: macos-latest
    
        steps:
          - name: Check out the repository
            uses: actions/checkout@v4
    
          - name: Set to XCode 16.0
            uses: maxim-lobanov/setup-xcode@v1
            with:
               xcode-version: '16.0'
    
          - name: Execute Unit tessts (iOS target)
            run: xcodebuild test -scheme 'EMOM timers' -destination 'platform=iOS Simulator,name=iPhone 16,OS=latest'
    
          - name: Execute Unit tessts (AW target)
            run: xcodebuild test -scheme 'EMOM timers Watch App' -destination 'platform=watchOS Simulator,name=Apple Watch Series 10 (42mm),OS=latest'
    

    The first tag is name, which contains the given name for the workflow. Next, the on tag defines which event can trigger the workflow to run. In this case, we are interested in executing the workflow when a pull request targets the main or develop branch (for available events, please review the documentation).

    Finally, we find the jobs section, which describes the tasks we want to execute. utest-job is the designated name for this job, and the environment where it will be executed is specified as macos-latest.

    Next, we find the steps, which outline the sequence of actions to be executed. The first step is to check out the repository. In this step, we specify a shell command, but instead, we see an action being referenced. An action is a piece of code created by the community to perform specific tasks. It is highly likely that someone has already written the action you need, so be sure to review GitHub Actions or GitHub Actions Marketplace.  The checkout action was defined in the GitHub Actions   repositoty, and we can see that its popularity is good, so let’s give it a try.

    The second step is to set the Xcode version to one that is compatible with your project. My project is currently working with Xcode 16.0, so we need to set it to that version. I found this action in the GitHub Action marketplace.

    The final two steps involve executing unit tests for each target. Now, we can commit and push our changes.

    Create a pull request on GitHub for your project, and at the end, you should see that the workflow is being executed.

    After few minutes…

    I aim you to force fail some unit test and push changes. Did allow you to integrate branch?

    Workflow for linting

    We are going to create a second workflow to verify that static syntax analysis (linting) is correct. For this purpose, we have created the following .yml GitHub Action workflow script:

    name: lint
    
    # Especifica en qué ramas se ejecutará el workflow
    on:
      pull_request:
        branches: [main, develop]
    jobs:
      lint:
        runs-on: macos-latest
        steps:
          - name: Checkout code
            uses: actions/checkout@v4
    
          - name: Install SwiftLint
            run: brew install swiftlint
    
          - name: Run SwiftLint
            run: swiftlint

    In this workflow, the name and job refer to the linting process, with the only differences being in the last two steps.

    The first step, as in the previous workflow, is to check out the branch. The next step is to install SwiftLint via Homebrew, and the final step is to run SwiftLint. In this case, we will deliberately trigger a linting error.

    Once we commit and push the change, let’s proceed to review the pull request. The lint workflow has been executed, and a linting error has been triggered. However, it is still possible to merge the pull request, which is what we want to avoid. In the next section, we’ll address this issue.

    Setup branch rules

    Now it’s time to block any merges on the develop branch. Go to your repository settings.

    In the Branches section, click Add rule under Branch protection rules and select Add a classic branch protection rule.

    Enter the branch name where the rule applies. In this case, it is develop. Check «Require status checks to pass before merging» and «Require branch to be up to date before merging». In the search box below, type the workflow name. In this case, we want the unit tests and linting to succeed before proceeding with the pull request.

    When we return to the pull request page (and possibly refresh), we will see that we are not allowed to merge. This was our goal: to block any pull request that does not meet the minimum quality requirements.

    This rule has been applied to the development branch. I leave it to the reader to apply the same rule to the main branch.

    Conclusions

    By integrating GitHub Actions into our team development process, we can automate tasks that help us avoid increasing technical debt.

    Related links