The aim of this pos is demystify Apple's hardware-backed security, bridging the gap between low-level cryptographic APIs and practical application development. It addresses a high industry demand for robust mobile security—especially in fintech and authentication—by demonstrating a complete end-to-end workflow from biometric authorization on an iPhone to backend cryptographic verification in Python.
Secure enclave
The Secure Enclave is a dedicated, hardware-based security subsystem built directly into Apple’s system-on-chip (SoC). It operates completely isolated from the main processor (the Application Processor) and the operating system (iOS) to provide an extra layer of security.
Here are its key hardware characteristics:
Isolated Processing & Storage: It features its own boot ROM, hardware random number generator (RNG), and dedicated cryptographic engines, with its memory encrypted dynamically.
Hardware-Bound Keys: Private keys generated within the Secure Enclave are physically bound to the device’s silicon. They cannot be exported, extracted, or backed up to iCloud, making them immune to software-based extraction even if the main OS kernel is compromised.
Biometric Integration: It works closely with the Secure Enclave processor to securely process and authorize actions via Touch ID or Face ID without exposing biometric templates to the rest of the system.
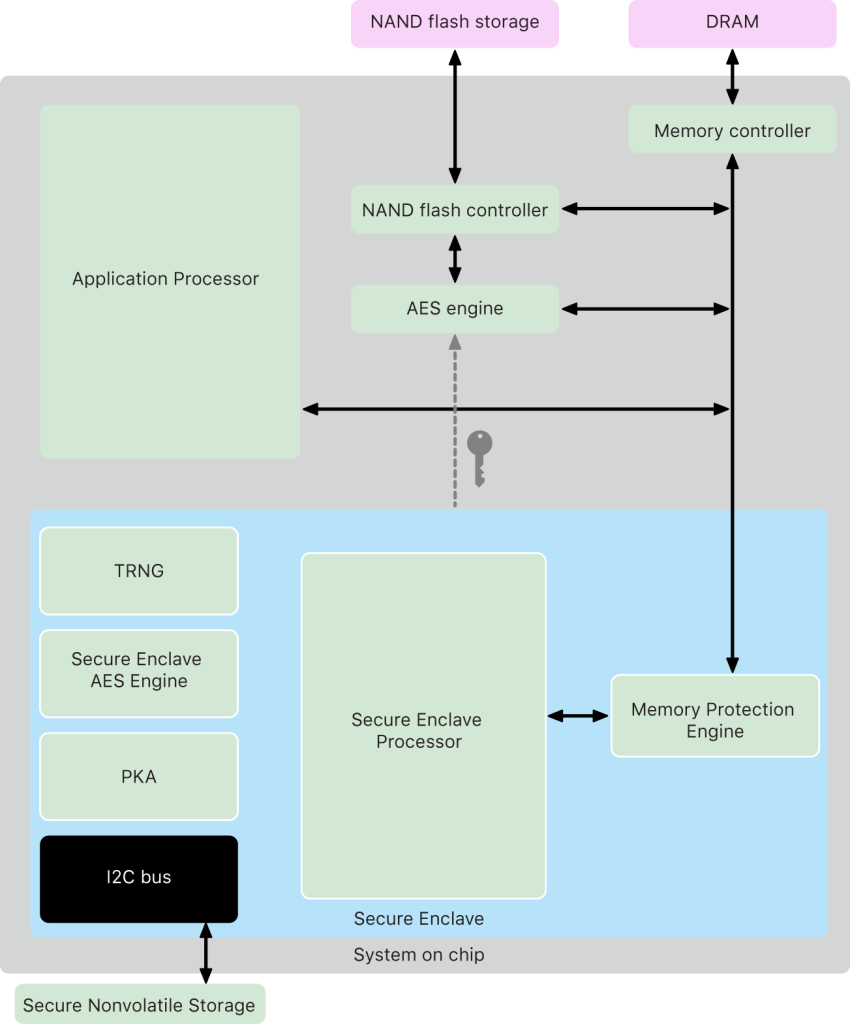
1. The Communication Channel: Hardware Mailboxes
- How it works: This is an internal, hardware-level messaging interface integrated directly into the silicon. The AP writes a request or command (e.g., asking to evaluate a keychain item or process a cryptographic operation) into a specific memory-mapped mailbox register, triggering an interrupt (doorbell signal) to the Secure Enclave.
- Request/Response Only: The AP can only drop messages into this mailbox and wait for a reply. It cannot execute code inside the Secure Enclave, peek into its execution registers, or manipulate its internal state.
2. How the Communications Are Secured (If No Bus Exists)
- Strict Memory Isolation (The Memory Protection Engine):Although the Secure Enclave shares access to the device’s main DRAM for running its OS (sepOS), it uses a dedicated, cryptographically protected region. Every time the Secure Enclave reads or writes to its memory, hardware logic called the Memory Protection Engine (MPE) encrypts and decrypts the data on-the-fly using AES in XEX mode alongside cryptographic authentication tags (CMAC). If the Application Processor attempts to read this memory space directly, it only sees randomized ciphertext.
- Independent Execution and Microkernel:The Secure Enclave runs its own stripped-down, highly secure microkernel (sepOS, based on L4) completely separate from iOS. Even if the entire iOS kernel is compromised by malware or a jailbreak, the attacker still has zero administrative control over the Secure Enclave because the software boundary and CPU privilege rings are strictly enforced by the SoC hardware.
- Crypto-Bound Operations (OS-Bound Keys):When data or keys pass back and forth via the mailbox, they are heavily encrypted. Furthermore, keys generated inside the Secure Enclave are bound to the hardware via a unique device ID (UID) and the cryptographic hash of the operating system image itself, ensuring that intercepted data packets are entirely useless if captured or replayed outside of that precise hardware context.
Key pair generation from Secure Sample iOS App
Our sample app what it does is just sign a message. But for doing that first thing that app does is request to Secure Enclave element to generate a public and private key pair:
        let deleteQuery: [String: Any] = [
            kSecClass as String: kSecClassKey,
            kSecAttrApplicationTag as String: keyTag.data(using: .utf8)!,
            kSecAttrKeyType as String: kSecAttrKeyTypeEC
        ]
        SecItemDelete(deleteQuery as CFDictionary)
Cleanup Existing Keys (SecItemDelete)
Before generating a new key, it checks if a key with the same application tag already exists in the iOS Keychain and deletes it to prevent conflicts.
        var error: Unmanaged<CFError>?
        guard let accessControl = SecAccessControlCreateWithFlags(
            nil,
            kSecAttrAccessibleAfterFirstUnlockThisDeviceOnly,
            [.privateKeyUsage, .biometryCurrentSet],
            &error
        ) else {
            statusLog = "Access control error: \(error.debugDescription)"
            return
        }
Define Security and Biometric Policies (SecAccessControlCreateWithFlags)
kSecAttrAccessibleAfterFirstUnlockThisDeviceOnly: Ensures the key can only be accessed after the user has unlocked the device at least once since boot, and it will not be included in iCloud backups.[.privateKeyUsage, .biometryCurrentSet]: Enforces that any usage of the private key requires Face ID or Touch ID authentication. Furthermore,.biometryCurrentSetensures that if a user adds a new fingerprint or face to the device later, this specific key is automatically invalidated, protecting against unauthorized additions.
        let attributes: [String: Any] = [
            kSecAttrKeyType as String: kSecAttrKeyTypeEC,
            kSecAttrKeySizeInBits as String: 256,
            kSecAttrTokenID as String: kSecAttrTokenIDSecureEnclave,
            kSecPrivateKeyAttrs as String: [
                kSecAttrIsPermanent as String: true,
                kSecAttrApplicationTag as String: keyTag.data(using: .utf8)!,
                kSecAttrAccessControl: accessControl
            ]
        ]
Configure Key Attributes (attributes)
Type & Size: Specifies an Elliptic Curve (EC) key of 256 bits (
kSecAttrKeyTypeEC), which is the standard curve used for modern secure communications (like P-256 / secp256r1).Token ID (
kSecAttrTokenIDSecureEnclave): This is the most critical line. It commands iOS to route the key generation request down to the hardware Secure Enclave, ensuring the private key never leaves the secure coprocessor’s isolated memory.Persistence: Sets
kSecAttrIsPermanentto true so the reference is safely stored in the system Keychain.
        var publicKeyRef, privateKeyRef: SecKey?
        let status = SecKeyGeneratePair(attributes as CFDictionary, &publicKeyRef, &privateKeyRef)

        guard status == errSecSuccess, let pubKey = publicKeyRef else {
            statusLog = "Error generating key: (Code: \(status))"
            return
        }
Generate the Key Pair (SecKeyGeneratePair)
Triggers the Secure Enclave hardware to mathematically generate the private/public key pair. The private key remains locked inside the Secure Enclave forever; it cannot be read by iOS or any app.
        var exportError: Unmanaged<CFError>?
        guard let pubKeyData = SecKeyCopyExternalRepresentation(pubKey, &exportError) else {
            statusLog = "Error exporting key"
            return
        }

        let pubKeyBase64 = (pubKeyData as Data).base64EncodedString()
        publicKeyDisplay = "Key ready (See console for PEM)"

        print("\n--- COPY THIS PUBLIC KEY FOR PYTHON ---")
        print(pubKeyBase64)
        print("---------------------------------------\n")

        isKeyCreated = true
        statusLog = "Success: Key created in Secure Enclave 🔒"
Export and Print the Public Key
Extracts the raw bytes of the public key (
SecKeyCopyExternalRepresentation), converts them into a Base64-encoded string, and prints them to the Xcode console.Why? Because the public key is safe to share. You would typically send this Base64 string to a backend server or a script (like Python) so the server can use it to verify signatures created by your iOS app.
Secure iOS App message signature
Second task that sample iOS app does is request message signature. Message is as simple and as critical as a money transfer authorization.
@State private var messageToSign = "Authorize transfer of 500€" What signature process does is following:
        let query: [String: Any] = [
            kSecClass as String: kSecClassKey,
            kSecAttrApplicationTag as String: keyTag.data(using: .utf8)!,
            kSecAttrKeyType as String: kSecAttrKeyTypeEC,
            kSecReturnRef as String: true
        ]

        var item: CFTypeRef?
        let status = SecItemCopyMatching(query as CFDictionary, &item)

        guard status == errSecSuccess, let rawItem = item else {
            signatureResult = "Could not retrieve the private key."
            return
        }
        let privateKey = rawItem as! SecKey
Retrieve the Private Key (SecItemCopyMatching)
When you get that
SecKeyobject in Swift, you do not hold the raw private key bytes. Instead, you hold a local cryptographic proxy object (a reference handle).
        guard let dataToSign = messageToSign.data(using: .utf8) else { return }

        var error: Unmanaged<CFError>?
        guard let signature = SecKeyCreateSignature(
            privateKey,
            .ecdsaSignatureMessageX962SHA256,
            dataToSign as CFData,
            &error
        ) as Data? else {
            signatureResult = "Signature cancelled or failed"
            return
        }

        let hexSig = signature.map { String(format: "%02hhx", $0) }.joined()
        signatureResult = hexSig

        print("\n--- COPY THIS HEXADECIMAL SIGNATURE FOR PYTHON ---")
        print(hexSig)
        print("------------------------------------------------\n")

        statusLog = "Signature successfully generated by hardware!"
Trigger Biometric Prompt & Execution
When you call SecKeyCreateSignature passing that reference:
iOS sends a command down the hardware mailbox to the Secure Enclave saying: «Hey, use the private key associated with this handle to sign this specific message data.»
The Secure Enclave pops up the Face ID / Touch ID prompt.
Once authenticated, the Secure Enclave performs the mathematical signing operation entirely inside its own secure silicon, using the private key that lives safely in its isolated memory.
The Secure Enclave spits out only the resulting signature back to iOS.
Secure iOS App wrap up
From user point of view what app does is request user for key generation and generate the signature (Cryptographic result) for a fixed message:
For facilitating validation in XCode logs windows are printed out public key in base64 and also an hexa string with the generated signature:
--- COPY THIS PUBLIC KEY FOR PYTHON ---
BFKD2YajWTN+yF9SOmAk6mebyJMuqbc/suP1uu0azpmp+55xYRhKCL3nmQJgYyau8z5GgtuSf3EPT0yEdwZg8WA=
---------------------------------------

--- COPY THIS HEXADECIMAL SIGNATURE FOR PYTHON ---
3045022035b35a8779457aa631858c1b48008d50b343e3b44ed4102e6730c70784c76bd5022100d63a02633ee2f899b4d00d3a6651df13f881968b58a5dbe2f4c46f7cb8e1ed36
------------------------------------------------
Validator script
For validating signature we have created a Python script, let’s going to analyze it:
# 1. Paste here only the Base64 string (without PEM headers)
pub_key_base64 = "BFKD2YajWTN+yF9SOmAk6mebyJMuqbc/suP1uu0azpmp+55xYRhKCL3nmQJgYyau8z5GgtuSf3EPT0yEdwZg8WA="
# 2. Your signature in Hexadecimal exactly as returned by the app
hex_signature = "3045022035b35a8779457aa631858c1b48008d50b343e3b44ed4102e6730c70784c76bd5022100d63a02633ee2f899b4d00d3a6651df13f881968b58a5dbe2f4c46f7cb8e1ed36"

# 3. The exact original message you signed in the app
message = "Authorize transfer of 5000€".encode('utf-8')
Inputs Preparation
pub_key_base64: Takes the Base64-encoded public key string that your iOS app printed to the console during key generation.hex_signature: Takes the hexadecimal signature string produced by the iOS app when you signed the message using Face ID/Touch ID.message: Recreates the exact original message string (Authorize transfer of 5000€) and encodes it into bytes using UTF-8. (Note: This must match the exact text signed on iOS, down to the last character and the euro symbol).Look out! message has been altered transfer value has been set to 5000 instead of 500
try:
    # A. Decode the public key from Base64 to raw bytes
    pub_key_bytes = base64.b64decode(pub_key_base64)

    # B. Reconstruct the public key using the P-256 (secp256r1) curve
    public_key = ec.EllipticCurvePublicKey.from_encoded_point(
        ec.SECP256R1(),
        pub_key_bytes
    )

    # C. Convert the hexadecimal signature to DER binary
    der_signature = binascii.unhexlify(hex_signature)

    # D. Verify the cryptographic signature
    public_key.verify(
        der_signature,
        message,
        ec.ECDSA(hashes.SHA256())
    )
Execution and Verification (try...except block)
Step A: Decode the Public Key
base64.b64decode(pub_key_base64)converts the Base64 text string back into its raw binary byte format.
Step B: Reconstruct the Public Key Object
ec.EllipticCurvePublicKey.from_encoded_point(...)rebuilds the public key object in Python using the P-256 curve (secp256r1), which is the exact same elliptic curve standard used by the iOS Secure Enclave.
Step C: Convert the Signature
binascii.unhexlify(hex_signature)transforms the hexadecimal signature string back into binary DER format so the cryptographic library can read it.
Step D: Mathematical Verification
public_key.verify(...)runs the cryptographic math. It checks whether the public key can successfully verify that the provided signature matches the message using ECDSA with SHA-256 (ec.ECDSA(hashes.SHA256())).
    print("\nVERIFICATION SUCCESSFUL! 🟢")
    print("The cryptogram was legitimately signed by the Secure Enclave of your iOS device.\n")

except Exception as e:
    print("\nVERIFICATION FAILED! 🔴")
    print("Error detail:", e, "\n")
Result Output
If successful (
VERIFICATION SUCCESSFUL!): The math checks out. Python confirms that the signature could only have been created by the corresponding private key living securely inside the iOS device’s hardware.
If it fails (
VERIFICATION FAILED!): An exception is thrown (e.g., if someone tampered with the message text, if the signature was altered, or if the public/private key pairs don’t match), indicating an invalid or fraudulent signature.
On executing validation script we can check that message was altered, as it was:

After restoring back the original message:
# 3. The exact original message you signed in the app
message = "Authorize transfer of 500€".encode('utf-8') 
Conclusions
Across this example I have presented how easily is to guarante that information that is generated on device can be securely signed.
You can find the source code for this example in the following GitHub repository.
References
- Secure Enclave
Apple Developer Documentation